Please see the Hints and Tips section for general information about areas and characters.
This guide was originally produced by Sophie Novakin, Kilrah, and Novin himself.
Prologue:
This part is pretty linear, so I'll just go through the choices.
First thing you'll notice upon leaving your apartment is an old man following you. If you hear him out you can get some hints as to the nature of the choice you'll make when you get to the bar. But, long story short, once you get to the bar, you'll be making a decision on what your class will be and a bit about your background that will have some effect on events and the like.
The choice is as follows:
Art: Fire element pyromancer class. Dps focused and will later be able to inspire allies.

- Current unique class skills:
- Flame cloak: a on any party member and deals damage to enemies targeting someone under its effect.
- Ember Hound: Summons a pet for three turns that attacks when able and can take a hit.
- Blaze Bullet: deals a high damage mixture of physical and magic attack as fire elemental damage. Limited uses.
Computer Science: Lightning element Technomancer. Will focus on manipulating enemy stats and multiple effect spells.

- Current unique class skills:
- Double Bolt: basically casts a lightning bolt spell twice, hitting a random enemy each time.
- Overclock: Gives an ally two actions twice at the cost of taking damage and having a massive debuff to all stats after it’s finished.
- Electro Bullet: deals a high damage mixture of physical and magic attack as lightning elemental damage. Limited uses.
Engineering: Earth element Geomancer. Will focus on defensive spells.

- Current unique skills:
- Sandstorm: Deals light damage to all enemies with a high chance of inflicting blind.
- Earth shield: “Summons” a bunch of shards of rock that will stick around and block half the damage you and your allies take for three turns (as of .0071, has been made OP to prevent a game-breaking glitch, unlikely to die so it’s fundamentally just a shave 50% damage off buff)
- Quake Bullet: deals a high damage mixture of physical and magic attack as earth elemental damage. Limited uses.
Psychology: Mind element Esper. Will focus on manipulating the enemy's actions.

- Current unique skills:
- Provoke: Deals minor damage to all enemies and forces them to target the user.
- Mental blast: Debuffs enemy magic and physical attack for 2 turns while dealing high damage. Has a cooldown.
- Mind Shatter Bullet: Limited use attack that stuns an enemy for a single turn and deals moderate damage.
After finishing up with the bar, after a few cutscenes you'll wind up in the first dungeon. There isn't much to say about this dungeon, it's a relatively straightforward run from point A to B. After it's done, you'll be in another dungeon, the Afterlife's Boundary.
The Boundary, Entrance:
As promised at the beginning of the game and by the title, you're now in a solidly post life situation. Now what? Well, let's find out.
This is the first of two parts to the boundary dungeon. All you need to do here is destroy all the enemies wandering about to open the portal.
Things of note:
- You can use each patch of crystals you see as a way to heal.
- Interacting with the portal and sign in different orders yields different dialogue (no real long-term effects, just a minor detail).
- The enemies are pretty easy.
After defeating all of the wisps and entering the portal you’ll arrive at the (heavenly check-in station) entrance to the “second stage”, be able to ask for more lore, but first you’ll need to say goodbye for now to your erstwhile companion as her admittance to the next life is ready first, and you’ll be faced with a choice.
Choices:
- Tell her she'll be fine ("You would've been fine."). Illia affection unchanged.
- Tell her you needed her ("No, I should thank you."). +1 Illia affection.
- Hug ("Hug her."). 2 Illia affection.
With that Illia leaves the party to not be seen for... Well, you'll find out.
Next, you're greeted with a long list of things to ask the receptionist. Everything here is purely setting exposition and whether or not you listen to it is up to your tolerance for yet more exposition.
After that, you'll end up going through a series of events that will end in you getting a new body with a class attached to it.
The only choice involved in this sequence will be your reaction to getting magic. Depending on your choice Ory will gain or lose an affection point with you.
- That's cool. +1 Ory affection, +1 acceptance.
- Is there a catch? Nothing.
- Sounds like a pain. -1 Ory affection, -1 acceptance.
And once you get sent off, we're to the second part of the boundary dungeon: the boundary abyss.
The Boundary Abyss:
Since this area is constantly in flux, it's not that easy to get around. Fortunately, the bureau made a solution: You'll notice terminals distributed on the islands. These terminals temporarily activate light bridges for you to cross.
The first step to activating them is using the keycard that Ory gave you on one of them to register yourself. In order to do that you must press the 'A' key on your keyboard, you cannot use it through the menu. Once done with that, you can use each terminal manually. Use them to navigate and look for treasure. You'll find the boss room in a spiral vortex on an island in the middle right side of the map.
Bad-end note: The first and only finished (at the moment) bad end can be accessed by falling off a bridge while out of mana.

Treasure guide:
Top left Island: 3 Fire Talisman
Middle Island: Synthesized Angel's Blood
Island with portal: Fire Talisman x1
Top right island: Synthesized Angel's Blood
Middle right island: 100 Eth Bottom right island, after long bridge: 200 Eth
Boss guide:
The Will-O-Wisp
HP: 950
Weakness: Fire
There are two phases to the boss’s pattern in this fight. The phases are divided by her health bar, if she is below 60%, she will switch to phase two. She will also, inevitably, summon two Mad Spirit to fight alongside her after two turns. Keep in mind that this does not use up an action for her, on the contrary, her newly summoned souls can act on the same turn they are summoned, so you might wanna keep that in mind and be sure that your health is looking alright. If you killed these enemies previously before they had a chance to explode, allow me to remind you that they will self-destruct two turns after taking a moderate amount of damage, wasting one turn on a charging action, but beyond that they're not particularly heavy damage dealers, though in concert with the boss they are certainly a threat.
Phase one:
During phase one she will randomly choose between summoning an icicle beneath you to deal high damage, or throwing a low damage ice ball that has a small chance of freezing you for a single turn. There's some random chance involved in how hard this phase can be, but it's relatively straightforward. The damage she dishes out in this stage is steady, but manageable. The only problem element comes from her summons adding to the damage she deals.
Phase two:
Our Will-O-Wisp is kind enough to inform you when she hits phase two. When she does, she maintains the moves from phase one, but has a much higher weighted preference to a charged up multi-hit super spell that does a lot of damage called Hail of Death that can outright kill you if you're not full health or guarding. Fortunately, though, this is very much telegraphed the turn before, where she'll use a charge action. If you haven't gotten rid of the adds by this point, things might become complicated. This will be expanded upon in the strategy brief.
Strategies:
Strategy 1: Use it if you got it!
If you're a good treasure hunter, you might've noticed that you've picked up a few Fire Talisman. These are single use AOE high damage Fire spells. You might've also noticed that the boss is weak to Fire. This coincidence can be put to great use: just burn the talismans and the boss will go down rather quickly. It's not quite an "I win" button, but it's pretty close to it.
The only thing you'll need to keep an eye on the damage and prevent yourself from dying if your health isn't up to par.
The other problem that comes up are the spirits she summons. As noted above, they explode two turns after being damaged. You might think "OK, then I'll just nuke them with an AOE twice and kill them and the boss at the same time", however there are two problems with this. First, while the talismans CAN kill both of them in two shots, it's not a sure thing. The spirits have resistance to fire damage, unlike their summoner, so with damage variance one or both of them might be left standing after two talisman uses. Of course, you have three turns to kill them, so the strategy could still work, except for the point where you're still taking damage from the boss.
Which brings us to the second problem: the phase two boss's charge attack. If you're not careful about your health management and timing, you could end up getting the spirits both in a high damage self-destruct state right when the boss begins charging up. If you have most of your health, you might be able to take the boss's ultimate and the two self-destructors in the face by guarding and heal the next turn, but that's iffy.
The best strategy for avoiding this problem is to hold off on hurting the boss with talismans until the two summons come in.
Strategy 2: Power through!
If you're the type of person to save all your elixirs until the final boss of the game, you might not want to use up the talismans you got. Fortunately for your hoarding tendencies, you don't have to.
If you're a Pyromancer, you might find this a little easier. However, bear in mind that the summons she brings out are Fire resistant, so you might be better off using Double Tap to bring them down.
Just keep an eye out for phase 2's charge while bringing down the adds, be careful not to be caught with an add on the verge of exploding at the same time as the boss is charging up a hail. If you keep your health up you should be able to guard through a Self-Destruct and Hail of Death.
Either way, once the deed is done, you'll be greeted with yet another cutscene. Once it finishes, you'll be in the main hub of the game. However, things don't open up just yet, so be prepared for a lot of dialogue.
-----------------------------------------------------------------------------------
Prologue, Necropolis: fusion
Alright, you survived the Will-O-Wisp, but you're still a ticking time bomb. What next? Well, Ory will take control of your party to bring you to her favorite person and someone you may (Or may not depending on your end goals) be visiting quite often: Ygor.
Just head out of the office and to the elevator. Once you make it to the elevator just interact with the panel and pick the only option available for the moment. Feel free to take the opportunity to save before you do so. Once you head up, you'll be greeted with your first fusion with a soul fragment. This first one is not optional, though it's relatively easy to get rid of.
From here you'll be taken to the infirmary, meet Ory's angel sister Sybil, and go on a montage field trip.
Short directions:
From the infirmary, head outside, go to the elevator, go to the lobby, go outside,
Side content: There's a semi-secret shop south of the subway entrance. Just talk to the fairy in the stall. You'll find it useful for selling an MP recovery item among some other things.
Go east and enter the subway, get a ticket, head through the turnstiles, head down one of the open staircases, watch the train come in and then enter it.
Series of cutscenes and montage. Arrive at Artemis apartments. Go to the east side of the building and up the emergency staircase for no particular reason.
From here you'll meet one of the apartment's residents, the Elf tailor Ellis. You'll be given an option to give her the main character's name or make up a female name. The former will bring you to an unfinished bad end, the latter will allow you to continue. After finishing up that convo without going into a bad end you'll be given back control.
Head down the hall and go inside the last door on the north side to enter Sybil's room. Here you'll be greeted by another series of cutscenes, culminating in breakfast downstairs with the House residents who are about to head out to an arena fight. You'll be introduced to each of them. After that, you'll be briefly given back control to allow you to leave and go on the job hunt again.
After another series of cutscenes, you'll end up back in Artemis and eventually end up getting a brand-new apartment. Again.
Get some sleep for the night and be woken up by a phone ringing. Ory summons you to her office.
Short directions:
Exit Artemis, having a bit of a convo with Ellis on your way out, but before going downstairs, go to the roof, you’ll find a healing item in a cardboard box at the top left. Head down to the subway, take the train, head west to the bureau building, enter it, go to 74f, go into Ory's office, head to 25f, ask around.
Side bit: Talking to the dog boy on the left side of the room and pressing him on maybe being a stalker has a minor effect on other convos.
Follow the flow of things from here and you'll eventually end up at the Dream of Avarice dungeon.
Dream of Avarice (1st visit):
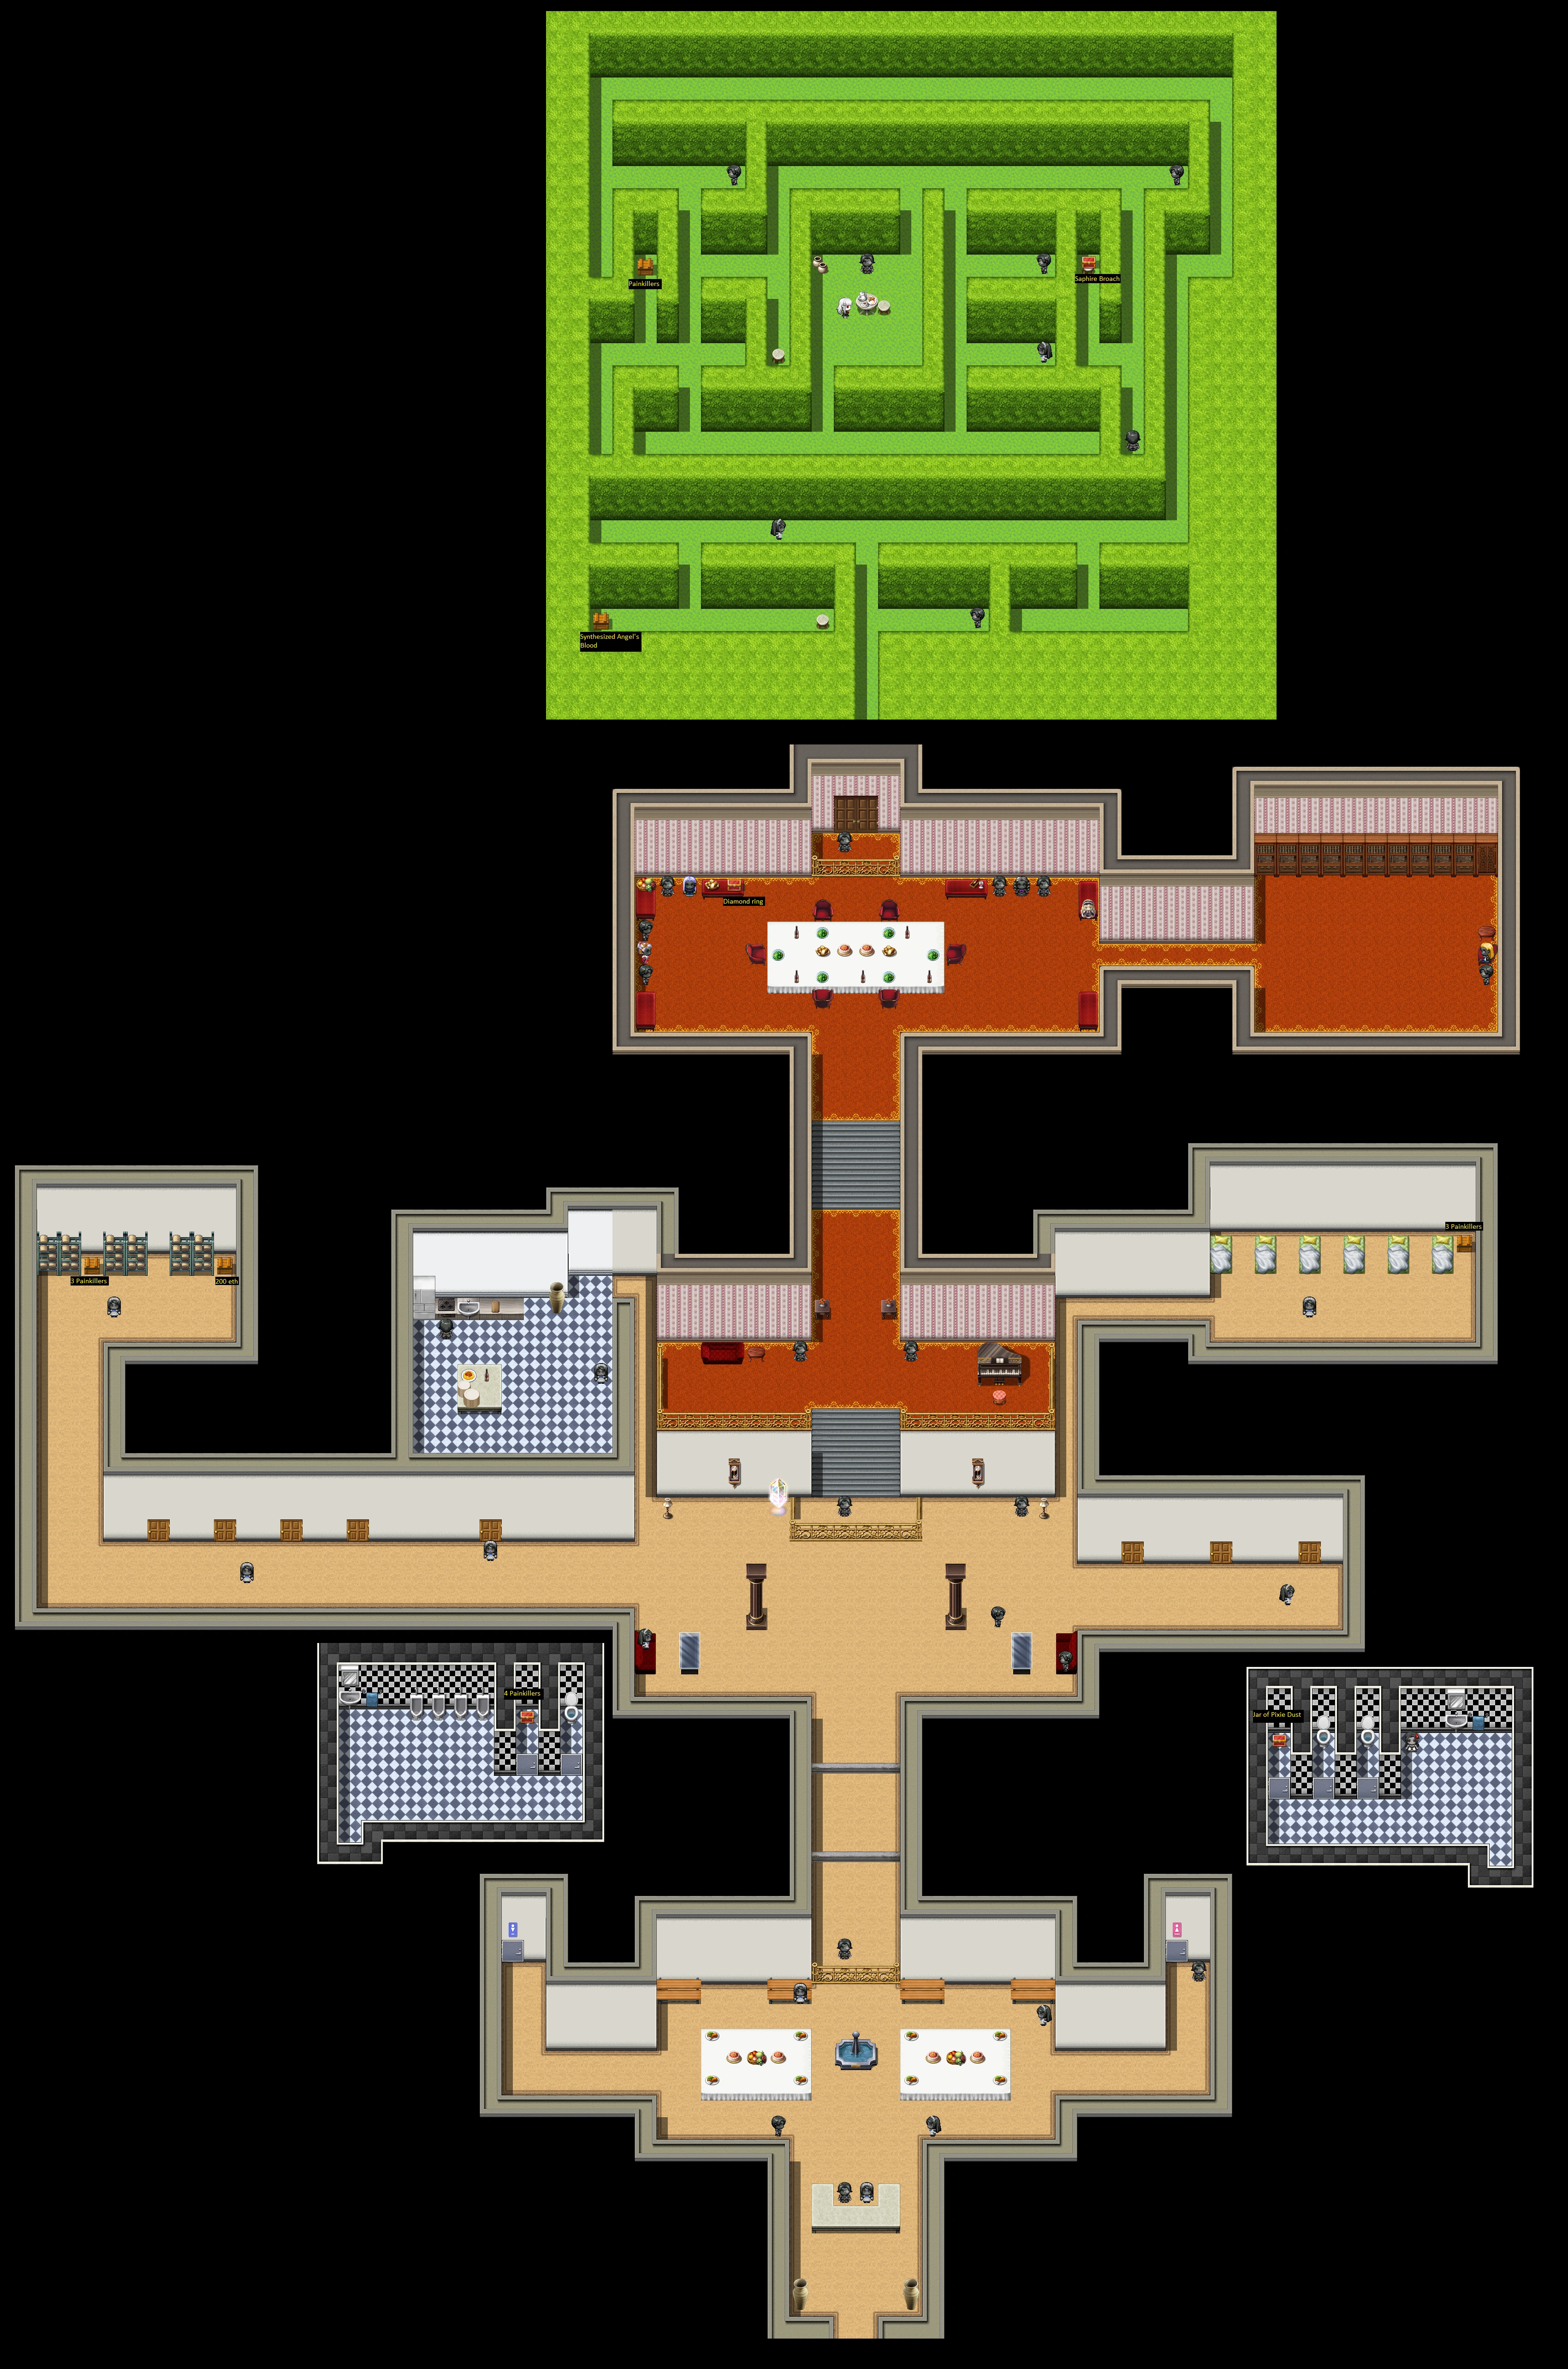
Alright, so you ended up visiting the Dream of Avarice with Erin for the first time. What next? Well, this is a pretty straightforward first dungeon visit, tutorial dungeon and all, so just go ahead and enter the mansion. When you do so you'll notice some faceless maids and butlers just waiting to greet you. Do not be fooled! When you get within sight range of these servants, they will chase you down. Unlike previous enemies, the ones in this dungeon will chase you down.
Enemies hit relatively hard quickly enough. Most enemies will go down in two to three hits for our protagonist and one to two for Erin. Head Butlers (the ones without scissors) have an AOE heal, so either take out your target before they act with focus fire or target them in particular. Beyond that you have a tactical choice to have Erin put up barriers to save items and use the elf as a mana battery or go full damage dealing to limit the enemy's damage potential. You can also tap Erin's normal attack for some Light element damage which all enemies here are weak to, but don't expect more than doing a tiny shred of damage to finish someone off, since Erin's attack stat is pretty wimpy. Just bear in mind running away is an option. You will get a few I-frames to move freely once you do.

As for what you actually have to do? For this trip it's rather straight-forward, however the order of operations matters a little. The points of note are the golden barrier with a butler behind it, the west bathroom hiding some Painkillers, and the east bathroom with a party guest.
The ideal way to go about things is to talk to the butler first, party guest second, but it doesn't make that much of a difference. If you do talk to the party guest last, you'll have an option to shoot first to start the battle with a little advantage. Don't worry about lasting consequences from this anti-social act, Erin won't hold a grudge and you would end up fighting this guest regardless.
First mini-boss: Party Guest
This is a relatively straightforward fight. The Party Guest herself will use either a single target or multi-target dark element spell that does medium damage. Her bulky bodyguards do reasonable damage, but they have a massive health pool. You can minimize the damage you take by using Erin's barrier spell and throwing in spells in-between.
Boss guide:
Party Guest HP: 900
Cup of Tea HP: 700
Strategy:
This is a rather straightforward fight. How you went about talking to the party guest will determine whether it starts neutral, with the boss attacking you, or with you attacking the boss. Overall, all of the enemies will dish out a reasonable amount of damage, though the party guest has an AOE in its line up and can heal, so you might consider prioritizing her.
-----------------------------------------------------------------------------------
Once that fight's finished, you'll get an invitation. You can use the invitation the same way you used the keycard back in the boundary abyss: press the A button to open the key items menu. You should use it on the golden barrier. Alternatively, you can just talk to the butler to show him the invitation.
After dealing with that head north to another cutscene. You'll run into another barrier. However, you'll find that you don't have the means to pass this barrier in the dungeon, and you'll have to come back another time. You can leave via the crystal, but before you do there's a bit of loot around you can grab. Head west to a storage room. In this room you'll find two wood chests, one containing Painkillers the other 200 Eth. With that finished, feel free to leave or grind at your leisure, though, bear in mind, grinding isn't really necessary.
After you leave, you'll have a few more cutscenes, an introduction to the cafe owner, Trixie, who is also an Artemis resident (and owner of the Red Rabbit which is located south of the Bureau Training Center) and then retire for the night after planning a shopping trip for the next day.
Act 1, New Beginnings
Official day one:
Now begins what the game will officially track as day one of your experience with the Afterlife. Yes, yes, it's technically the third day in the Afterlife, but who's counting, really? Anyway, once you get up, you'll want to take a shower (don't worry it's not something you'll have to do regularly). While doing so you might note a mirror in the bathroom, you can interact with this to view the main character's appearance (art included) and mood.
After showering, when you go back toward the exit, you'll notice someone knocking at your door. Answer and you'll be whisked off to a shopping trip with Sybil and Trixie.
Shopping Trip:
The pair will bring you to the Mausoleum Mall, which contains a lot of shops you'll want to visit regularly, you can return in the future via the subway. There are a few things you'll be introduced to here, but the important bits are clothes and furniture shopping. Either case, you'll be whisked away to Ellis's shop, Sylvan Grace. After another cutscene you'll be able to head up to the changing room. You should probably save.
Once you head into the changing room, you'll be prompted with a choice that will bump, do nothing to, or subtract from the acceptance variable, I think you can guess what each choice does, and then you'll go through a bit of a fashion show where you see how each of the clothes that Ellis is willing to give to you for free look like. You'll also get a general impression of what they're good for. Picking what someone suggests will also net you an affection point with them. Regardless, you'll be able to buy the other outfits later if you want, and there will be more available as the game progresses (as well as a way to upgrade in a later version).
Choices:
Stats: Atk +4, Def +12, M.Def +17, Agl +2
+1 Ellis Affection
Stats: Atk +2, Def +10, M.Def +11, M.Atk +7
+1 Trixie Affection, +1 Erin Affection
Stats: Def +19, M.Atk +4, M.def +12
+1 Sybil Affection
After that's done, you'll take Erin and Sybil to Eternal Rest, the mall's furniture store. On the way you can stop by the shop next door, which is basically an item shop, where you can use Eth. As time advances, they'll have new stuff available to buy.
Whether or not you choose to go into Terry's Arsenal (Basic Ray Gun you can buy there for 650 Eth gives MC an AoE special instead of double tap and it deals Light element damage meaning it works particularly well in the Dream of Avarice dungeon), you'll have to go to Eternal Rest eventually. Here you'll be introduced to the furniture system. At the moment, there's no way to make pink furniture more appealing to the main character in current content, if you were wondering.
Once you head to the north side of the store, you'll notice a teddy bear that's on sale in a furniture store for some reason. If you want to give in to the lonely child compulsion, which will net you some satisfaction and avoid some satisfaction loss, you can buy the Teddy Bear. Regardless, go ahead and buy what furniture you want.
Hint: There's a fragment compulsion from the first week's dungeon that will require more than a minimum decoration score, specifically you'll need 65 decoration score. It's not too difficult to get that much (though still not going to happen with just your starting 1000 Points), but you'll have to look into getting a decent bed to be more efficient about it.
After you're done, you'll return to your newly decorated pad. After sleeping you'll have three days to do whatever you want with (so long as one is spent in the dungeon).
You'll notice at this point you're more or less free to do whatever you want with your time. The days in Afterlife are more or less broken into four time slots:
-Early morning: This is where you wake up and get your satisfaction report and potentially story related phone calls. There's nothing to do but read during this brief time slot.
-The two free time slots: You get two time slots in which you determine how to spend your time: Morning/noon and Afternoon/evening. Some events are only available in one or the other timeslot, and things that require two time slots, such as visiting a dungeon, can only be done in the morning.
-Night: At night you're confined to your room. There isn't much to do other than looking in the mirror and going to bed.
At the moment min maxing your time is pretty much impossible since you can only get so far in any given character's event progression (2-3 advancing events for all characters). However, it's also impossible to see every unique event in current game time. Novin tries to ensure there are enough events for the player to be able to experience a unique event for every time slot and in the interest of meeting that goal, Novin tries to put in enough unique events for the next week's release before advancing time. If you want to see your options and the benefits to spending your free time doing certain things, skip to the section on free time events at the end. Below are the required bits to continue with the story without running into a dead end.
Week 1, Dream of Avarice:
For this trip, you'll be bringing Sybil along. She's a good healer and all the enemies in the Dream of Avarice take an extra 40% damage from Light element attacks, which her main magic attack deals in.
Even if you plan to not wear a dress as much as possible, when you head back to the Dream of Avarice, you'll have to wear the outfit you got from Ellis to make progress in the dungeon. Once you have it on and head back to the barrier, the butler will let you through. You'll find yourself at some kind of party. Go ahead and talk to the butler behind the barrier to find out what the schtick here is. A bunch of colorful ladies are about, and they all have recommendations that you need to pass the barrier. Specifically, you have 4 color ladies and need 3 recommendations. Also, the host of this party would prefer if you did not inflict violence on them, though you're free to try. The reward for not being directly violent is 1200 Eth, the reward for bringing a beatdown is 150 or so more exp (per fight) and a couple hundred Eth. If you want to take the "peaceful" route, there are a couple of ways you can do that, but there is one way that's ideal.
Lady Black wants you to kill Lady Yellow outright. This is violent, and will result in a failure to please the host.
Lady Black (+ Head Butler x1 + A cup of Tea x2)
151 exp, 145 Eth, 2 Painkillers; The lady herself is weak to Light Element.
Lady Yellow wants her lost Diamond Ring, which is a decent accessory (but still completely overshadowed by Rabbit’s Foot Keychain, which you can buy for 400 Eth at the mall, so you’re really not losing anything that’s valuable long term).
Lady Yellow (+ Head Butler + A cup of Tea)
113 exp, 125 Eth, 1 Painkillers; No weakness.
Lady Blue's broke and wants some cash, 200 Eth to be specific.
Lady Blue (+ A cup of Tea x2)
126 exp, 30 Eth (not a typo, just 30, she's broke, remember?), 2 Painkillers; Has a weakness to Fire
Lady White wants you to deliver suspicious wine to Lady Black. Though if you kill Lady black in combat Lady White herself will attack you.
Lady White (+ A cup of Tea + Butler x3)
139 exp, 199 Eth, 1-4 Painkillers; No weakness.
So, you wanna keep the accessory and get three commendations "peacefully", right? As it turns out, the wine that Lady White wants to give Lady Black is poisoned, so if you give her the wine, take Lady Black's commendation after she keels over, go back and get a commendation from Lady White and then pay off Blue you have three commendations and can get your 1000 Eth.
However a more lucrative approach (provided you do not need to take extra costs in consumables to manage it) would be to just kill all 4 of them. You end up with 499 Eth, 529 exp (close to around half a level’s worth), and about 7 Painkillers and get to keep the ring. Peacefully you’d end up with either +1000 Eth and the ring or +1200 Eth. Considering that each Painkillers is worth 150 Eth at the mall you come out on top both exp-wise and materially. Erin will complain, but there is no affection loss from this.
If you do decide to fight, Overload Shot from Basic Ray Gun makes those fights much easier (light AoE vs 3-5 enemies, and almost all of them are weak to it). Also note that if you already talked to the “barrier butler” you might be barred from taking the 4th fight. So either fight before talking to him or fight lady white last.
Once you're done, you can talk to the butler to open the last barrier and bring you to a hedge maze, at the center of which is the boss. There are three treasure chests of note here. Go left after entering to get a Synthesized Angel's Blood. The next chest you'll see following the route will have Painkillers, and finally the small red chest will contain a nice Sapphire Broach accessory. Be sure to grab it before seeing the boss, once you engage, you'll have to spend another day to return.
Once you're done with that you can head out to greet the boss.
Avatar of Avarice Boss Fight:
HP: 1800
Weakness: Light Element
The boss itself will randomly swap between using a single hit magic attack, a high damage snip like the butlers, an AOE magic attack and an AOE heal. The Aspect of Luxury guarding it will dish out, and take a decent amount of damage itself. On top of that, every 2 turns after the first the boss will summon a Head Butler, capable of healing her. Taking them out quickly is advised.
Strategy 1 & 2: I went to the dungeon on the first day possible
If you went to the dungeon on the first day possible or didn't do any event that gave your companions or yourself new abilities, then your options are limited, but do not worry. The fight is still very doable. If you want to play defensively and have Erin put up barriers before characters take significant damage and Sybil focus on healing, that's a perfectly viable strategy. Or if you want to go offensively and just use Erin for offense and using Sybil's group heal (that damages herself without healing her), that could work too, but you have to be careful about your health.
Even with extra abilities that aren't Provoke, the strategy choices are the same.
Strategy 3: ESPER 101
If you're an ESPER and took the first class, you have a rather convenient combo here for defense. Between the Esper's AOE Provoke attack and Erin's Barrier, you can pretty easily fend off single target attacks. Though, the avatar's AOE will still hit everyone.
-----------------------------------------------------------------------------------
So, with the boss defeated you'll be brought back to the Bureau building to turn in the quest. You'll get a nice stack of Points and receive the Fragment of Avarice to either fuse with. As a note, not fusing with any fragment until 4/26 will unlock the cat eye tf, but will delay the compulsion progression by that much time.
Arena Fight, First Week:
If you've done the dungeon before the deadline, you'll soon run into your first arena fight. You'll be able to head to the subway to go to your destination. If you forgot to stock up on healing items, never fear, your buddy Ory is here to save the day and sell you some stuff. Though, the prices are... inflated. Either case, you're up for some placement matches, which will be four back to back matches. Only two of them are particularly difficult and you only need to succeed at 3 of them to continue (though, you'll get a bonus day if you complete all four and you do get a unique cutscene, physical tf, and affection opportunity if you don't). Either case, you'll get a smidge of health (50 specifically) back between matches, but you won't be getting your MP back.
Placement Match 1, Dragon Knight:
HP: 850
The Dragon Knight you're up against first packs a mean punch and can take a hit. Keep your health above 300 if you want to survive this fight, as his double strike can brutalize you. He's fairly resistant to physical attacks but significantly more vulnerable to magical ones. The pyromancer's flame cloak can help punish him for his powerful attacks to allow you to do damage while you heal, or the geomancer's sandstorm can make him whiff enough to make the fight less brutal if you took additional classes. The technomancer's double bolt is an evergreen move in these fights as far as DPS goes.
If you want to save on MP but still do reasonable damage, you can use Cold Flame if you have it. It does most of the damage of a normal magical spell for less MP and has a small chance to Stun.
Placement Match 2, Fae Mage:
HP: 550
The Fae Mage will alternate between a reasonable damage melee lightning attack and a high damage Double Bolt. Regardless, she's rather weak to physical attacks and lacks a large HP pool.
Placement Match 3, Simis Ninja:
HP: 650
This one's not particularly strong, but he's fast. He'll always attack first, pelting you with blows. Fortunately, he's not too hard to bring down, but he is highly resistant to magic. You might consider saving your MP for the next fight by using double tap.
Placement Match 4, Iradi Juggernaut:
HP: 1500
As the name implies, this is one meaty combatant. He has high physical defense and reasonable magic defense. On top of that he has an ability called Roar that can stack twice to lower your damage output. That being said, he's predictable. He'll use his most powerful attack, Rend, every two turns. Keep yourself healed and if you're a geomancer that can blind, do so, as all his reasonable damage attacks are physical and can miss.
-------------------------------------------------------------------------------------------------
If you lost fight four:
You'll find yourself waking in a tube healing. Whether or not you get a choice here depends on whether your satisfaction is above 80 or not. If it's not you'll have an option to make a snide remark. If you choose that option, you'll receive -1 Ory affection and +1 Sybil affection. If you don't, you'll get +1 affection with both. As a note, you would get an extra free day if you won the 4th fight, which would let you get at least as much affection with them if you choose to visit them.
As a consequence to this healing, you'll receive a TF of sorts: you'll have slimmed down to an unhealthy weight:
- Almost anorexic look
- -4 Physical Defense
- +3 Agility
If you win fight four:
You'll see a different cutscene, take a rest for the night, and get a bonus day where you have no obligations. Spend it how you see fit.
Regardless, when you make it back to your apartment, you'll see a quick rundown of how the MC feels about how things are going, based on acceptance, satisfaction, what you've worn and how much you've talked to people.
Act 2, Week 2: Teamwork!
After getting a day off or not depending on how you did in the arena, you'll be called for a team meeting the next day. Myara has hatched a plan to make you, Seki, and Delia build some teamwork before the next arena fight. Which means doing a mission together. Myara's already picked out the mission in this case, you're heading to some place called the Abyss of Clouds. Go ahead and go to the Bureau building.
Missable Bonus content alert: While on the way to the Bureau building, you can stop by the Red Rabbit. If you do, Seki will tell you you have no time for it while Delia will want to go in. You'll get an +1 affection with whoever you side with, and you'll get a bonus scene and some satisfaction if you actually go inside.
Once you work out getting the mission, you can go ahead to the Abyss of Clouds. If you keep your eyes open you might notice a familiar stalker as well. Regardless, after a bit the three of you will end up in the Abyss of Clouds.
Abyss of Clouds, First Day:
Warning: Potentially glitchy gimmick here. Save often!
So, you'll find yourself on a cloud island to start, with some wildly wandering enemies. Speaking of enemies, here's a guide to what you'll encounter in this dungeon:
New companions:
Seki: Very much the tanky type. She has a large health pool and good defense, and she has good physical damage as well as two different taunts, one of which is a medium damage guaranteed hit. Her magical attack might be weak, but her Gale Blade will allow her to attack before enemies do and can have a high utility depending on how it's used. If you get two events involving her out of the way you'll also gain an additional multi-hit high damage physical attack.
Delia: Her health isn't particularly high, but she has good magical attacks and can heal herself by sucking on an ally in a pinch, which will also give her a buff. Her most noteworthy ability is Hemorrhage, which will deal more damage to an enemy the more injured they are. It does lower damage than her basic magic attack on a full health enemy, but an enemy nearing death can be ripped to shreds with a single cast of it. Additionally, it uses less mana than her basic magic attack, making her an efficient damage dealer.
Enemy Guide:
Clouds: There are two types, storm clouds and white clouds. White clouds are particularly wimpy in the health and damage department. One shot from an Earth magic spell or two from any other spell will take them down. However, they have a high physical evasion rate and will often act first. They are also resistant to Wind. The storm clouds are slower, have a little more health, but pack a punch. Taking them down quickly might be a decent idea.
Stalkers: These enemies utilize a new mechanic called Stealth. Stealth allows them to have an extremely high evasion rate against both physical and magical attacks as well as a high critical rate. These guys don't have much health, and their damage output isn't THAT high even when they crit, but relying on normal attacks to get them is counterproductive.
For the first day, the best way to deal with them is to rely on Seki's Vicious Strike to hit them. When they're not stealthed, you can get a guaranteed Gale Blade hit, since it will allow Seki to act before them, as well. Just have your other party members focus on killing other enemies to avoid having to deal with RNG.
Later on, you'll get an additional party member that will be extremely quick, and act first. So you can deal with them between their first attack and Seki's Gale Blade before they stealth. If you hit them while they're stealthed, they will likely be brought out of it.
Hopefuls: These enemies will only appear in one fight on the first day, and more fights past it. They can both heal their allies and debuff you, as well as shave down your mana, so they should be a high priority target.
Mega Fans: These guys are basically heavy hitting tanks (~90-100 damage per attack). Easy to hit but meaty..
Paparazzi: Can Blind.The paparazzi is identifiable by its blue hawaiian shirt and camera. It has the ability to take a photo, which blinds and takes away some MP. High priority target.
---------------------------------------------------
You'll also notice that there are some other cloud islands with chests on them. Later, you'll be able to jump on them and take their stuff, however Delia's aversion to heights and super dangerous jumps will prevent you from doing so. Instead, you may only travel to other islands on convenient cloud platforms that make it to the edge of whatever island you happen to be on. The locations these platforms meet with land are often marked by convenient white pulsating circles.
With that said you'll find one to your west and north west. The north west moving platform will lead you to a chest containing some Synthesized Angel's Blood. The west one will bring you to another large island with more enemies. From that island, your goal is to the south, to get there you'll need to ride another moving cloud that can take you to two other islands, one of which has a chest containing an Earth's Grasp Talisman.
Once you make it to the southern island, you'll be confronted by a creeper who has a particularly creepy quest for you. His reward is info on how to advance in the dungeon and a key piece, which you can also get by killing him. Now, in this case actually doing exactly what he says is not an ideal result in the least.
There are quite a few ways this event can go, and it centers around a necessary piece of the dungeon, so I'll just outline them quickly.
The Creep's Desire:
If you cut him down on the spot, Seki will be pleased (+1 Seki affection) with you and it won't fuss Delia too much (no affection change with Delia).
If you decide to cut him down while Delia says there might be more information to find out there, you'll lose no affection with anyone, but also gain none.
If you feed the apple to the wrong twin, you'll end up fighting the creeper anyway and getting -1 Delia affection .
If you feed him the correct apple without finding the other half of the key, you'll get -1 Seki affection.
If you feed him the correct apple after Delia says you have all the info you need already (found the other half of the key and the keyhole), you'll get -1 affection with both girls.
If you murder him after Delia says you have all the info you need, you'll gain +1 Delia affection .
If you do decide to fight him, he'll be joined by two clouds. He's basically a beefed-up stalker with the ability to do an AOE blind.
---------------------------------------------
With that out of the way, head south and watch a short cutscene. Follow the recruiter inside at your leisure, or pick up the chest to the east, which contains Cloudthread , an upgrade material. You can bring this to Ellis to figure out how upgrading works (as of .006). Once in the house, you'll continue eavesdropping on them. If you haven't killed the Creeper already and for some reason despite the negative result, want to do what the creeper says then you can find an apple in the fridge. Don't worry, the pair at the table will pay you no mind.
Now head up the stairs. Next to the piano there's a chest with 150 Eth. Take it if you like. After that, head into the west most room. You'll find a small red chest to loot that will contain half of a cloudy key. After that's done, exit the building to see the girls head into the small dome beneath the slide. Follow them and you'll find that there's a keyhole there. Interact with the keyhole to take note of it. You'll now be able to murder the creeper and get affection with Delia.
Anyway, once you get the other half of the key from the creeper somehow or another, you can use the item menu by pressing 'A' to put the key pieces together and then use it on the keyhole. Once done, head outside and you'll see that using the key created a staircase run into a boss fight.
Recruiter Boss Fight:
This is a two-part fight. First, you'll be fighting some mobs. It's not too hard a fight. Don't worry about coming out of it healed, though, because the first move in the next fight will bring your health extremely low regardless of how much health you had in the previous. The Recruiter himself will start the fight with a powerful idol barrage that will bring you to low health. This is scripted. You’ll lose a teammate during the aftermath, but fortunately, a stalker will jump in to save the day. He'll give you a heal, throw down a smoke bomb to give you Stealth, and join you in your fight.
New Party Member:
Kita:
He has extremely high agility, and his Kunai is unique in that it scales with both physical attack and agility. Because of his high agility, he'll most often attack first. Ability-wise he has a mana efficient needle rain attack, the ability to Stealth, and an extremely powerful attack that can only be used from stealth: Vital Strike. The only ability that has the potential to do more damage than Vital Strike is Hemorrhage. On top of that, Vital Strike causes a Bleed effect which causes slight damage over time and causes blood-based attacks, like Hemorrhage, to deal even more damage.
-----------
Back to the boss fight.
HP: 1750
The Recruiter has two phases. When he's above 60% he'll attack, buff his allies, and do a single hit magic attack. Below 60% he'll add charging to his routine to do another Idol Barrage (not as powerful as the first one, though). Between the hopefuls debuffing you and his reasonable damage output, you could have some trouble. Regardless, feel free to use up all your mana and all of Kita's Smoke Bombs on this fight, this is the last mandatory fight of this visit.
Taking out the Hopefuls first is the best strategy. Before taking damage, The Recruiter's damage output is middling. Once you have him by himself, it isn't too hard to take him down.
------------------------
Once that fight's done you should head north to the moving platform and go up the stairs that the previous cutscene showed and use the crystal to get out.
Post first Abyss of Clouds visit:
After that mess, you'll end up in what may or may not be a familiar location depending on whether you beat all four fights last week: the hospital. After a cutscene and confrontation where Delia storms off, you decide to take a walk to clear your head. Of course, you end up lost. By the sheer coincidence of Delia perhaps having the same idea about clearing her head, you run into the little vampire menace. You decide to stalk follow her to figure out what she saw and is up to. While following her you'll run into a familiar face who Delia seems to share some history with, confronting some thugs. The thugs aren't particularly hard to deal with. Once you're done, you'll be able to make a choice of whether to side against Delia-ish. If you do, you'll get -1 Delia affection, if you don't, you'll gain and lose nothing.
After all is said and done, you'll have another goal, and you'll find a new, potentially useful resident to the House in the near future. She'll be on the north end of the dining hall and provide massages in the mornings without using up a time slot. A massage will give you a stat buff for the day. The first massage is free, the following ones are 100 Points.
Abyss of Clouds
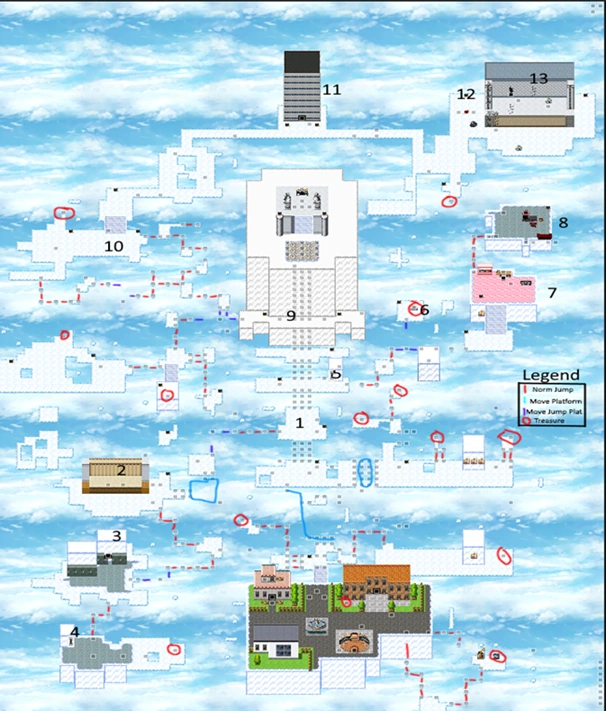
On your second visit to the Abyss of Clouds you'll be able to finally jump from platform to platform. This will allow you to access things you couldn't before, including the route to progress the dungeon. Refer to the map below:
The assumed starting point for the rest of the guide is 1. You can get the treasure at any point during your visit before you get to the main stage.
Short directions:
Go west from 1, and take the clouds to 2. At 2, watch cutscene, then head south to 3. Go inside the entrance at 3.
The signing event:
Be prepared for a fight when you enter, as you’ll immediately be forced into a fight against some security and a Hopeful. From there, you can spot a chest. Go ahead and get it, however, bear in mind that you might be swamped by enemies if they’re following you. Next talk to the guy on the south-east wall. He’ll try to rope you into another questionable questline, but Seki will have none of that. She’ll attack immediately, bringing you into a miniboss fight against the “ultimate fan”
Ultimate Fan Boss Fight:
HP: 2590
This guy isn’t actually anything special. He’ll dish out a decent amount of damage, swapping between AOE and a single hit physical attack, but beyond that he’s just a slug out fight.
------------------------------------
After killing him, you’ll find that you now have another cloud key. Head back outside and to point four to use it.
Once you’ve done that, you’ll unlock another staircase to heaven. Or not heaven. Either case, head back and go up it as you please. You’ll see the keyhole for this section right away. In order to get the key, you’ll have to head east. Do so and you’ll note the moving platform that you can jump onto on the map also can lead to loot. Jump north and you’ll find your first hair changing piece of equipment at 6. From there head to 7 and watch a cutscene. After that’s done, head north to 8, and watch another cutscene. You’ll note a glowing orb of light floating above a trash bin. Talk to it.
Muse:
This doesn’t have to be a fight depending on your choices. The benefit to fighting it is a bit of extra exp, the benefit to talking it out is a bit of satisfaction (3, specifically) and +1 Seki affection (Though it won’t show up right away). This choice will be tracked for the purpose of other things.
If you want to be peaceful, select try to reason it out. From there say you’re there to help. Any other choice will end in violence.
If you don’t, it’s not too hard a fight. You can get a free hit in if you decide to skip negotiation.
-------------------------------------------
Regardless of your choice head back to 5 and use the key on the keyhole. Go up to 9 and grab the chest that you saw above the keyhole. From there head west, pick up whatever treasure you want to grab and go to 10. From there, you can go inside the skyscraper at 11, however you’ll have to go to 12 and then 13 to get access to the stairwell at 11. Once you go by there and read the note, head to the skyscraper, go up the long stairway, and into the Manager’s office.
He’ll act like a villain and fight you, bringing you to the last miniboss fight of this dungeon.
HP: 2500
He’s pretty similar to the recruiter, he has the same idol barrage skill when he’s below 60%, however he adds an Enrage ability to the mix which can make things complicated when it comes up against anyone that’s not Seki. Regardless, you can treat this fight like the recruiter one.
-------------------
Once that’s finished, you’ll find that he had the key. And the keyhole is on the wall behind his desk. Use the key again and you’ll unlock the final staircase to the main stage. Go ahead there. Before you do, check the map to make sure you got all the treasure you want.
Amo and Ami fight:
HP: 2800 * 2
Preface: The fragment you get from these two will depend on the order you kill them in. There isn’t going to be a huge difference between each shard’s progression beyond a difference in ability (one will give you an aoe sleep spell that also debuffs attack, the other an aoe fire attack that buffs ally’s attack). Also, killing them at the same time will just result in one absorbing the other anyway, so there’s no need to try.
These two come with two clouds and a hopeful supporting them. They each have different routines that complement each other as well Amo has an AOE sleep spell, an AOE heal, and a powerful charged AOE attack. She’ll only use the sleep spell every two turns. Ami has a single hit unmissable spell, an AOE debuff like the hopefuls, and a powerful charged AOE. Both have large health pools and they’ll completely regain all their HP when you kill one or the other, they’ll fuse with the other to heal and get a huge buff.
After winning the fight, you will get the fragment of the last of the two you defeated. Defeating Amo last will get you the Fragment of a Loving Idol's Soul, defeating Ami last will get you the Fragment of a Fiery Idol's Soul. They both give the same bonuses and tf (with a different flavour for the scenes) but each grants a unique spell. The Fragment of a Loving Idol's Soul eventually gives you the Lullaby spell, which debuffs all enemies' attack for two turns and has a 50% chance of inflicting sleep. The Fragment of a Fiery Idol's Soul eventually gives you the Fiery Solo spell, which buffs your party’s attack for two turns and deals unavoidable fire damage to all the enemies.
Strategy 1: Cheese it
You probably stocked up on quite a few talismans following the map. Using them will make the fight a lot easier.
Strategy 2:
Take out the adds first, getting rid of the hopeful in particular would help things along. Starting off Seki with a taunt will give her enough TP to put out good damage and Sybil’s AOE heal on top of that makes for an efficient combo. If you’re a pyromancer, giving Seki Flame Cloak on top of that will greatly increase damage output.
--------------------------
Once you finish the fight, you’ll head back to the bureau building to turn in the quest. You’ll also receive an affection point with Seki if you dealt with the muse peacefully. Take your money and wait for the arena fight. Do what you can to prepare, or whatever you want for that matter.
The first time you're back at Artemis after completing the dungeon, you'll see have a conversation with Myara that gives you +1 Myara affection.
Special events during week 2:
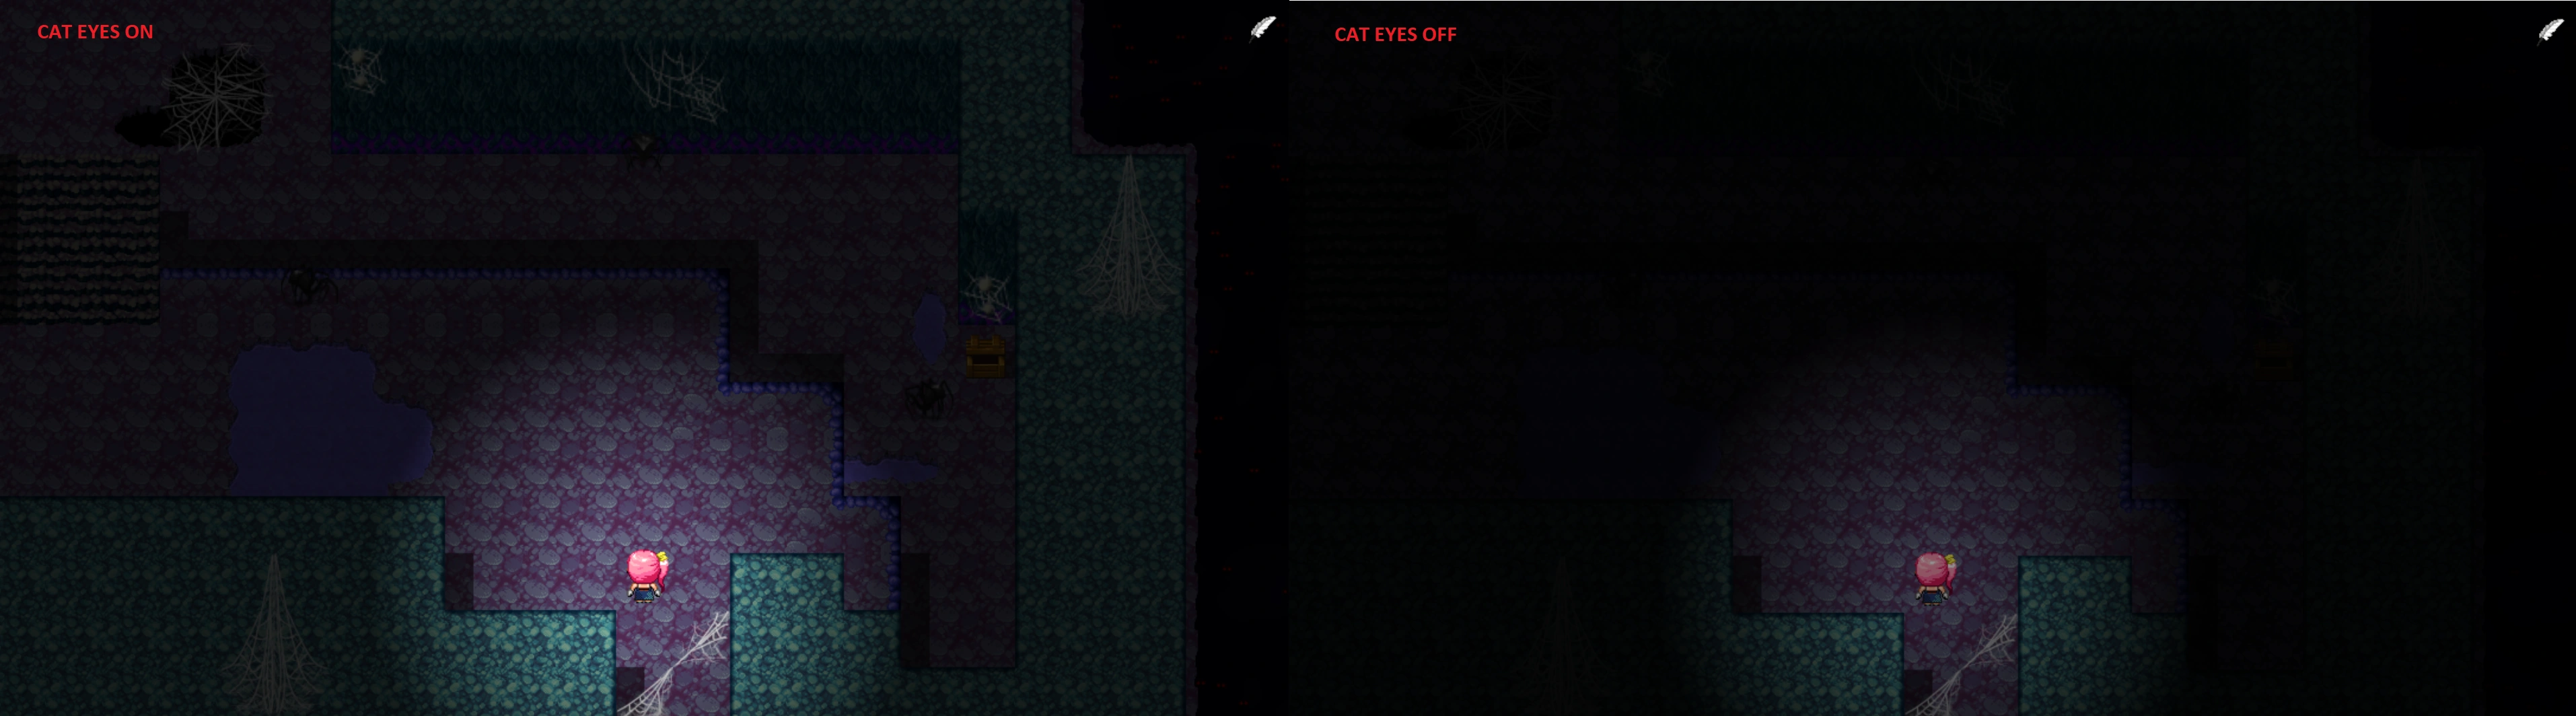
Week 2 is the earliest time when you can get the soul depletion event. This event happens on the 04/26 if you haven’t fused with any other shard by that point. This will unlock a new method of maintaining your soul, by paying Eth at the spiritualist shop instead of using your fusion privileges. As a note, this will also unlock the possibility to gain the cat eyes tf (by accepting the free session), which grants you +3 Attack, +1 Myara affection, +1 acceptance if you say you like them, and has the additional benefit of making the Dream Catcher’s dungeon in week 3 a lot easier to navigate. (It also changes your eye color to light blue, so keep that in mind) The “Soul Depletion 1” debuff gained during this event decreases your magical attack by 25%, and your max HP and MP by 10%.
Letting your soul deplete further by neither fusing with a shard nor paying Eth at the spiritualist shop grants the “Soul Depletion 2” debuff, decreasing your magical attack and your max HP and MP further.
If your soul depletes even more, the next stage after that is a game over.
Note: if your satisfaction is too low, you will get a game over directly instead of the 2 stages of debuffs.
During the scene with Ory and Ygor, you can get +1 Ory affection by selecting “I just kinda figured I didn't need to.” when she asks why you didn’t fuse with any fragment.
Week 2 also has an optional dungeon from 04/26 to 05/03 (see Erin 3 event).
Arena Fight, Second Week:
So, you've run out of time after completing the Abyss of Clouds, huh? Well, now you're at the second arena fight. But, what's this? Someone is missing? Whelp, too bad. You're in for a three vs four fight. During the breakfast before the fight, Myara will advise you to taunt him during the fight. If you agree you’ll gain +1 Myara affection, while if you think that’s a bad idea you’ll gain an +1 Seki affection. Either way, you’ll get the temporary skill “Heckle”.
After breakfast, you'll be carted off to the arena's waiting room. Here Ory will approach you with an offer. Drink her fruity flavored blood for a temporary power boost to give you a win despite your disadvantage and also net you a menu of tfs later ranging from dick enlarge/shrink, to boobage and buttage (choice dependant), as well as an +1 Ory affection.
It’s not impossible to win if you don’t take her up on it though.
The fight AI itself is rather scripted. Max will prioritize defending the dark elf and buffing his allies, the dark elf will constantly heal and put up barriers, the unvis will alternate between pepper spraying and beating the daylights out of people with a chance of stun, the snake sniper will Mark a target and shoot them the next turn.
The unvis is difficult to deal with due to constantly having an invisibility effect on it. Seki can get sure hits in, but the dark elf will make it difficult for the damage to stick. The sniper deals high damage and can even stun his targets. Max is only dangerous rather than defensive when you Heckle him (which will greatly decrease his defense) or when you get rid of his offensive allies. If you choose to blow fire all over the place via Ory’s blood, the fight will go quickly. Max might be resistant to fire damage, but his friends aren’t. They’ll melt away quickly.
If you want to avoid questionable blood drinking, however, you’ll need to be careful. Seki can take their hits, so having her taunt will help everyone else and give her a pool of TP to use on her abilities. You can either use Heckle to leave Max open to a beatdown and get some amusing dialogue or focus on the DPS. The sniper is perfectly hittable for every party member, so he seems like a fine first target. Don’t be afraid to use HP items.
If you used the fire breath move, after the battle Seki will note that she didn’t know you could do that. If you say you can’t do that all the time you’ll gain +1 Seki affection. If you say that you didn’t know you could either, Sybil will (badly) cover for you and you’ll get +1 Sybil affection. If you didn't use the fire breath move (whether you drank Ory's blood or not), you'll get an +1 affection with both instead. After some more dialogue with Ory and Laha, you’ll end up returning to your room.
Notes for the post-fight TF scene you get if you used Ory’s blood:
- Choosing Erin gives options between a dick growth level (tease) or a dick shrink level (used)
- Choosing Ory gives options between a dick growth level (envy) or a dick shrink level (turned on)
- Choosing Seki gives options between a breasts increase or a butt increase level
- Choosing Sybil gives options between a breasts increase or dick growth level (imagine penetrating her)
- Choosing no one lets you finish focusing on dick, ejaculation, or nipples; choosing dick gives a dick growth level, ejaculation gives a dick shrink level, nipples gives the nipples tf if not already acquired, or a breasts increase level otherwise.
If you drank Ory’s blood but didn’t actually use the skill during the fight, you also get:
- +2 Agility
- +3 Attack
After the TF scene, you’ll get a call with Illia. You can either tell her the truth about your identity or lie, the latter of which gets +1 Illia affection. Either way, your choice will affect things later.
Week 3: Delia
Rescuing Delia:
As soon as you wake up, you’ll be taken downstairs to a mandatory conversation before heading out on the mission to rescue Delia. Going to your room immediately after the conversation at the stairs softlocks you as of version .0071(B) (“too tired to do anything else today”)
Before leaving the building, talk to Ceita, near the kitchen: since Delia helped rescue her before, she will offer you a free massage to help rescue Delia. Note that you can’t re-enter the house after leaving.
Once in the subway, you get to choose the fourth member of your party. Choosing Kita will give you an accessory only he can equip which has great stats (+5Att, +3Def, +2M.Att, +3M.Def, +3Agi, +4Luck). Choosing Erin will give you an accessory that everyone BUT Erin can equip (+4Def, -10Att, +20M.Def, -4Agi, -4Luck).
When you first enter the lair, a cutscene will ensue in which you are back in your apartment from the start of the game, with some changes depending on which shards/compulsions you have. When your girlfriend Eve comes, you have the choice to kiss her or not. Kissing her results in a game over (no bad end, as of V.0071(B)). If you don’t, you’ll end up in a fight with your fake girlfriend-turned-dryder. The fight is pretty easy, especially if you have the Mark skill - the dryder will try and Blind you and is weak against your gun.
Your next choice will be to interrupt Sybil or wait for her. Waiting gives you +1 Sybil affection, interrupting gives you -1 Sybil affection. While going down the rope if you're wearing a skirt, Sybil will comment on being careful not to show your male equipment to the others. If your satisfaction is under 100, you'll get an opportunity to gain +1 acceptance by choosing "There are plus sides". Next, you come to Seki after she has killed some spiders (if you pushed Sybil to go immediately, you’ll see the end of the fight against the spiders), she joins the party after some quick dialogue. Finally, you come to either Kita or Erin depending on who you chose for your fourth party member. This is where you get the accessory for Kita or Erin.
After gathering your party, you move on to rescuing Delia. From where you start, take the web bridge down for a chest. Also, on this first level, on the far left side there is a chest. On the second level (where the house is) there is a chest to either side of the house. In the house, you encounter a ‘Lord of Darkness’ of which there are four who each have an orb. There’s one in the room behind the first, one on the top left, and one on the top right. The other rooms have chests with the exception of the furthest right one on the ground floor which has an interesting bit of lore about Delia.
After collecting all four orbs, you must put them in the pillars in front of the main door up the stairs. The order from left to right is bottom left pillar: Bloody Dawn, top left pillar: Final Sunsets, top right pillar: Twilight, bottom right pillar: Blackest Night (this is actually the same order in which they appear on the list in the “A” menu). Make sure you use the mana crystal before entering the next room, as this is the room where you fight Delia. (also note that you will not be able to grab the chest to the left of her after the fight, so do that before approaching the throne)
Delia comes with two vampire pair adds. The pairs will heal, so defeat them first. Using Seki’s Battlecry and (the attack under Special that taunts enemies) as well as keeping on top of healing using Sybil will make this fight fairly easy.
After the fight, you go into a cutscene at the hospital.
Night Out
As of version 0.007(F), the two available options are the karaoke or to stay in.
Karaoke
Quick summary
There are a lot of variations here, so only the main paths (ie. the ones with tfs) are described in this part, feel free to explore or go below to the Detailed paths to know more :) .
NOTE: Wearing Magic Glasses before this event allows for an additional “transformation” when you’re getting one of them (not quite a transformation, since you can take it on and off)
There are a lot of paths in this event (I’ve counted more than 40 variations), based on whether or not you’ve fused with the idol shard and your choices during the event. All paths will give at least +1 affection with Delia, Seki and Myara, and a satisfaction boost.
There are 2 different TF accessible on some of the paths, but you can only get at most one of them in this event. The first possible tf is a hair color change (pink or blonde depending on your choice during the event). This will also give you +1 Ory affection. The choice to get this tf are either:
- How about we try a group competition?>Pick a different straw.>Let Seki pick something.>Any>Sure, why not? (for Blonde) or Pink's fine. (for Pink)
- This path only works if you haven’t fused with the idol shard: Sure.>Go with something easy.>Take the cheaper punishment.>Any>Sure, why not? (for Blonde) or Pink's fine. (for Pink)
The other possible TF is a beauty mark and if you are currently equipped with the head accessory Magic Glasses (you can buy them at Terry’s Arsenal at the mausoleum for 300 Points) and have long hair, they are transformed into Cursed Magic Glasses with an impressive +14M.Att. When equipped the Cursed Magic Glasses also transform your hair into two giant braids and make you a bit clumsier (a slight malus to hit rate). Despite their name, the Cursed Magic Glasses can be removed at any time by the player, so it’s your choice whether to use them or not. To get this TF, you need to have fused with the idol shard and select one of these paths:
- Sure.>Go with something easy.>Get Seki to hug Delia.
- Sure.>Pick a song you're at least somewhat familiar with.>Get Seki to hug Delia.
- Sure.>You feel drawn to pick a particular song....>Get Seki to hug Delia.
One other notable path is:
- Sure.>Just pick something random and see what happens. : this path gives you a lot of satisfaction points (15) and is rather fun to watch too
The other paths are also worth watching in my (humble player’s) opinion, so feel free to explore this event before committing to a path, the game should let you save just before the start of the event.
Detailed paths
All paths will give at minimum an +1 affection with Delia, Seki and Myara and +6 satisfaction. Additional gains based on choices are described below:
Group Competition
- Picking the left (short) straw will put you on a team with Myara, and net +1 Myara affection and ultimately +3 satisfaction. Seki and Delia will sing a slow yet sorrowful song and get "79 points!!! Bewitching Duo!".
- Without the voice tf, either choice will result in a loss, and you'll learn that Myara was a grandma before her death of old age and that she is now 95 years old (including her time in the afterlife).
- As a punishment for your loss, Delia will make you sing embarassing songs.
- With the voice tf, either choice will result in a win
- If you let Myara pick, you'll sing a hard rock song/metal and will find the experience cathartic. Your score: "81 points!!! Metalheads!" if you never sang before, "85 points!!! Metalheads!" otherwise.
- If you choose something you both know, based on what Ory made Myara listen to, you'll sing a Rave song and get "83 points! Ravers." if you never sang before, "86 points! Ravers." otherwise.
- As a punishment for their loss, Myara will make Delia and Seki put on transforming costumes, Delia in the pink-haired bimbo Britany, Seki in the peace-loving and extremely zen sheep-girl Nirvana.
- Picking a different straw will put you on a team with Seki. Myara and Delia will get "85 points!!! Rocking duo!".
- Choose a song from home, with "screamy" parts for Seki
- Letting Seki pick a song will see you sing a howling song from her planet and you'll get a crushing loss with "55 points! Novice howler.".
- Choosing the idol song from the previous dungeon:
- Without the voice tf, you will lose and get "69 points! Aspiring Idols!"
- With the voice tf, you will win and get "90 points! Aspiring Idols!"
- If you won, ultimately you'll get +3 satisfaction and you get the choice of either:
- Pressing Delia about her diary (provided you found it during her rescue), she will tell you about how a mentor stabbed her in the back when she was alive and you'll get +1 Delia affection. Seki will send Myara get food and drinks as a punishment, and Myara will just order them.
- Sending them on an errand, you send Myara and Delia to Trixie's cafe to get cakes and coffee. While they are gone, Seki will demonstrate a howling song from her planet, and you'll understand her a little better, gaining +1 Seki affection.
- If you lost with a regular song, Myara will make you and Seki wear transforming costumes, you in the pink-haired bimbo Britany, Seki in the peace-loving and extremely zen sheep-girl Nirvana, who will end up either curled in Delia's lap getting petted or being cuddled by Delia. If you:
- Lean into it, you'll get +1 Myara affection and have a great time (+2 satisfaction)
- Choose "Whatever...", you'll get nothing.
- If you lost with the howling song, as above Myara will make you and Seki wear transforming costumes, you in the pink-haired bimbo Britany, Seki in the peace-loving and extremely zen sheep-girl Nirvana, but in addition, she will send you deliver a bottle to the next room. Regardless of the following choices, you'll get +1 affection with Myara and Seki. If you choose to Lean into it, you'll also get +2 satisfaction. In the next room, you'll meet Ory, Sybil and Mila (she will have extra dialogue if she is your teacher). Ory will make you sing and dance, and ultimately you'll be tricked into potentially being victim to Sybil's power and either get the hair color change tf (pink or blonde depending on your choice during the event) and +1 Ory affection or avoid it and get nothing
- Suggesting drawing 4 straws will put you on a team with Delia. This path will get you +1 Delia affection and +1 satisfaction. Myara and Seki will get "75 points!!! Rockstars!" with their song.
- If you express confidence in your singing:
- Without the voice tf, you will lose and get "38 points! Butcherers of Music!", angering Delia in the process. As punishment for the loss, Myara will make Delia wear a transforming costume, the peace-loving and extremely zen sheep-girl Nirvana and Seki makes you take care of Nirvana, which will get you back into Delia's good graces
- With the voice tf, you will win and get "94 points! Flawless Singers!" if you sang before, "89 points! Singers of Souls!" otherwise
- If you express doubt in your singing:
Solo Competition
- Delia will go first and get "84 points!!! Soulful singer!"
- Myara will go second and get "80 points!!! Part-time rocker!"
- Seki will go fourth with her horrifying howling song and get "76 points!!! Proficient Wailer!"
- If you Go with something easy, you'll sing a catchy advertisement, gaining +1 Seki affection
- Without the voice tf, you'll lose and if you've never sang before, you'll get "55 points!!! Mediocre advertiser!", otherwise "65 points!!! Mediocre advertiser!". As a punishment Myara will make you wear a transforming costume, the pink-haired bimbo Britany. You'll get the possibility to pay 100 Points to take it off immediately, getting you +2 satisfaction. If you don't, you can either:
- Lean into it, you'll get +1 Myara affection and have a great time (+2 satisfaction)
- Choose "Whatever...", you'll get nothing.
- As an additional punishment for your choice of song, you're sent to deliver a bottle to the next room. In the next room, you'll meet Ory, Sybil and Mila (she will have extra dialogue if she is your teacher). Ory will make you sing and dance, and ultimately you'll be tricked into potentially being victim to Sybil's power and either get the hair color change tf (pink or blonde depending on your choice during the event) and +1 Ory affection or avoid it and get nothing
- With the voice tf, you'll win and if you've never sang before, you'll get "95 points!!! Jingle songstress!", otherwise "100 points!!! Flawless Saleswoman!"
- If you Pick a song you're at least somewhat familar with, you'll sing a song from the OST of an RPG game
- Without the voice tf, you'll lose and if you've never sang before, you'll get "67 points! Leviathan Tamer!", otherwise "72 points! Leviathan's Tamer!". As a punishment Myara will make you wear a transforming costume, the pink-haired bimbo Britany. You'll get the possibility to pay 100 Points to take it off immediately, getting you +2 satisfaction. If you don't, you can either:
- Lean into it, you'll get +1 Myara affection and have a great time (+4 satisfaction)
- Choose "Whatever...", you'll get nothing.
- With the voice tf, you'll win and if you've never sang before, you'll get "87 points! Leviathan's Priestess!", otherwise "94 points! Leviathan's Priestess!"
- If you Just pick something random and see what happens, you'll lose and get "38 points!!! Saloon clearer!", amusing Myara and gaining +1 Myara affection. As a punishment Myara will make you wear a transforming costume, but will go easy on you and choose the peace-loving and extremely zen sheep-girl Nirvana. You'll have a wonderful time and Delia will love this you: +2 affection with Delia and +9 satisfaction. Delia makes Seki call her Mistress as punishment, but being distracted by Nirvana, she takes it easy on Seki.
- If You feel drawn to pick a particular song, only available with the voice tf and the associated compulsion, you'll win and get +1 Delia affection and +1 satisfaction. If you've never sang before, you'll get "87 points!!! Idol!", otherwise "94 points!!! Idol master!"
- If you won, you will get the choice between:
- Get Myara to talk in Nyas: Delia will make Seki call her Mistress, you overall have a pleasant night and get +2 satisfaction
- Get Seki to hug Delia: Seki uses this as an opportunity to bear hug Delia and get some revenge. Delia then decides to target you for the next punishment instead of Myara and she gives you the beauty mark tf and if you're wearing glasses and have long hair, she will curse them into cursed glasses, making you clumsy with braids whenever you equip them. At the end of the night, you can ask Delia to take the beauty mark off, removing the tf but getting -1 Delia affection or keep it and get +1 Delia affection
Stay in
You decide to say in and play a truth or dare card game. All paths will give at minimum +1 affection with Delia, Seki and Myara. Additional gains based on choices are described below:
- Play safe: Delia wins the first round and dares Seki to strip, which she does with no embarrassment. You and Delia being distracted by her nudity and Myara having poor luck, Seki wins the second round and of course, dares Delia to strip. If you then tell Delia she looks good, you gain +1 Delia affection. Aterwards you all go watch TV and get +5 satisfaction.
- Play agressively: you win the first round, leaving you to decide between:
- Myara: she chooses truth and you ask her how old she is. You learn she died at 85 and is now 95 (and incidentally, that a week is 9 days in the Afterlife, 8, with a 3 days week-end on Trinis (Myara's planet), 5, with a 1 day week-end, on Endala (Seki's planet) and that Nosferatu don't care about days or weeks) and you get +1 Myara affection. Delia wins the second round and dares Seki to strip, which she does with no embarrassment. Aterwards you all go watch TV and get +5 satisfaction.
- Daring Delia: you dare her to chug a bottle of wine, she gets drunk and kinda hit on Seki. Myara puts a stop to it and makes Delia use purge. Myara wins the second round and as retribution for your choice in round 1, she dares you to get bitten by Delia. Delia still being a little drunk is unable to stop herself and you lose conciousness. You wake up in your bed, with Sybil healing you. You end up with the pale skin tf (see below) and you get +1 affection with Sybil, Seki and Myara and +2 Delia affection. You get either -5 satisfaction from this event, or -3 instead if your acceptance is high enough.
- Daring Seki: you dare her to hug Delia. Delia tries to flee and is chased by Seki and you can bet with Myara that either:
- Seki will be tired first: Delia overhears it and you get +1 Delia affection
- Delia will be tired first: Seki overhears it and you get +1 Seki affection
- You then also win the second round and are left to choose between:
- Myara: she chooses truth and you ask her how old she is. You learn she died at 85 and is now 95 (and incidentally, that a week is 9 days in the Afterlife, 8, with a 3 days week-end on Trinis (Myara's planet), 5, with a 1 day week-end, on Endala (Seki's planet) and that Nosferatu don't care about days or weeks) and you get +1 affection with Myara. Afterwards you all go watch TV and get +5 satisfaction.
- Daring Delia: you dare her to chug a bottle of wine, she gets drunk and Myara asks her why she was reluctant to be hugged by Seki. Delia reveals that she likes how Seki smells and was afraid that she would be unable to contain herself and end up biting Seki, which would cause Seki to ask for Delia to be thrown off the team. Myara makes Delia use purge and afterwards you all go watch TV and get +5 satisfaction.
- Manipulate the game: Myara wins the first round and dares Delia to suck you off (vampire style, not sex style ;) ).
- If you accept you get +1 affection with Myara and Delia and you and Delia being distracted by all this, Seki wins the second round. She decides to dare Delia to grovel before her and afterwards you all go watch TV and get +5 satisfaction.
- If you refuse Delia bites Myara instead and you easily win the second round, and Myara still being out of it, it leaves you to decide between:
- Daring Delia: you dare her to get chug a bottle of wine, she gets drunk and kinda hit on Seki. Myara puts a stop to it and makes Delia use purge. Afterwards you all go watch TV and, but you feel guilty about what happened and only get +2 satisfaction.
- Daring Seki: you dare her to hug Delia. Delia tries to flee and is chased by Seki and you can bet with Myara that either:
The pale skin tf gives you:
- Pale skin
- -50 HP
- -4 Physical Defense
- +3 Magic Defense
- +10 MP
Dream Catcher's Lair:
As of v.0.007, if you previously unlocked the cat eyes tf, instead of being in the dark with a halo of light around you, the dungeon will only be slightly darker than usual, making it a lot easier to navigate. In this version a new mini quest is also available, to find lost drones on the map that can serve as lamps. If you find some drones (or even better all 4 drones), you get a bonus reward in Points at the end. Also, the dungeon has been changed to have less enemies in it, making it easier and less time consuming.
As a note, there is also a mini-quest available in the office building, if you take the usb key from the office boss. Following that mini-quest to the end grants you 100 Eth (and an insight into the life of an office worker :) ). It is best not to kill the office boss the first time you talk to him, if you kill him after talking to him again, you get a satisfaction bonus.
The following passage was written for the .00652(A) version:
Not a lot to say here as yet. Best strategy I have found seems to be to hoard talismans if you can and blast your way through the fights with the echoes. Also, pairing up the pyro’s Flame cloak with Seki’s battle cry and Erin’s barrier makes for a really tanky meatshield. Haven’t tested it yet on the Dream Catcher though. If you go for this dungeon, you’re gonna want a lot of health and mana pots. They don’t pop up often and trying to fight through the whole dungeon is a bit of a grind. If you do though, there is a pile of Spider silk in it for you, as well as a pair of equippable gloves and you’ll level up the party a few times. The bump to your stats will come in handy. The Dream Catcher is a beast to fight, and can use the abilities of the echoes against you. Having a few stimulants on hand is also not a bad Idea. If you take out the echoes, the boss fight becomes a straight brawl, with several vampire and spider minions in the way. If Erin has learned Mana Blast and/or you have some talismans, you can clear them out and get some respectable damage on the Dream Catcher. That said, I can’t underestate that she hits like a truck. Map for the Latest Dungeon:
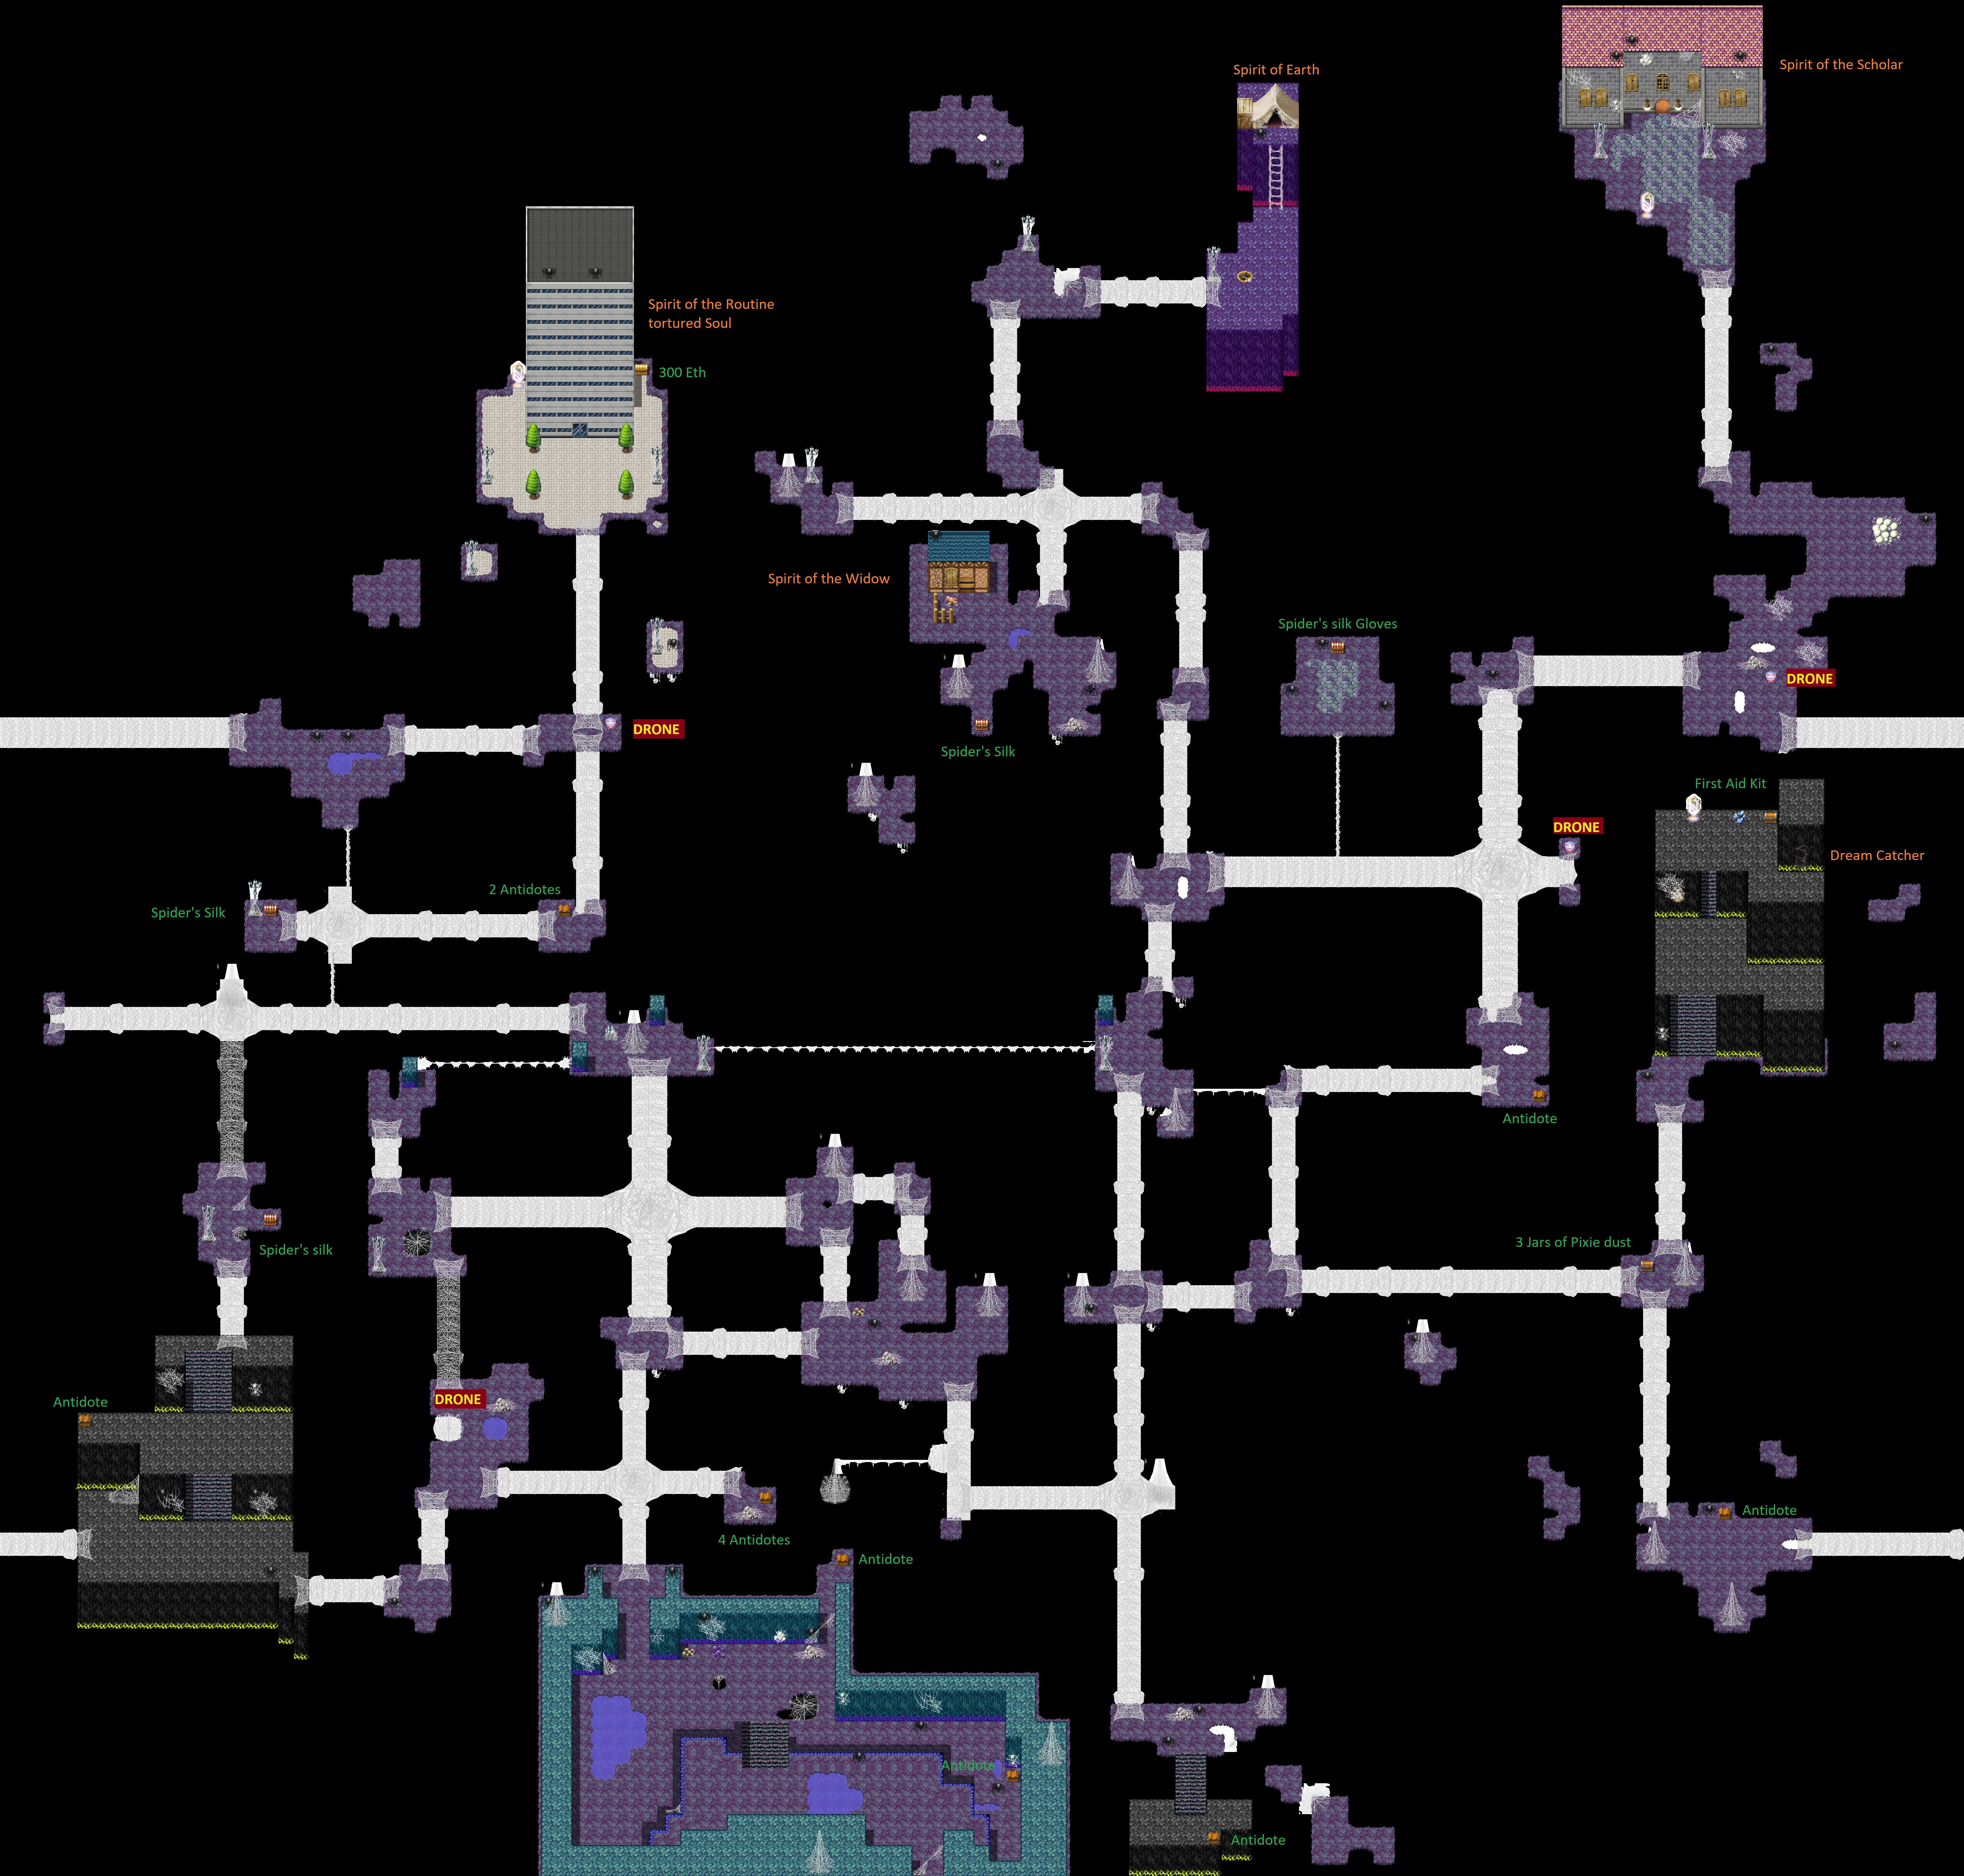

Illia’s rescue
The last night before the arena fight, you will get a call from Illia. This will trigger a rescue mission to save her. Before going, you have the opportunity to call Erin to help (that will grant you +1 Erin affection, if you don’t call, he’ll come anyway but you’ll get -1 Erin affection), and if you’ve seen enough events with Felix, you will be able to call him to help too.
The rescue itself is a timed event in which you must avoid being detected by the enemies or, if you are detected, defeat them quickly to avoid losing time. If you are detected too many times a game over can occur.
When you reach the part where the exits send you back to the same map, you will need to find the hidden path that is in the gray wall (it’s on the fourth square from the left of the wall). Erin will give you hints about the wall after you take the other exits enough times). There are 2 hidden chests inside the wall, one to the left and one to the right, when you get at the top of the wall.
After that you will get to a cutscene with Illia, followed by a fight against a boss.
After defeating the boss, you need to escape the woods and return to the exit. Examining the bodies on the ground will grant +1 Illia affection. There won’t be any more enemies to watch out for along the path, so feel free to pick up the hidden chests if you passed them by earlier. There will be an extra scene if you decide to take your time on the way back.
After returning, you will get a cutscene, depending on whether you told Illia the truth about you previously and after that you will have the opportunity to access the shower scene. Your choices during that scene may impact your affection with Firefly. You’ll reach the current end of content the next morning.
Free time event guide:
You can spend your free time with, and get closer to, a large variety of characters. Doing so will have a variety of bonuses and potential tfs attached to them dependent on the character. In addition to this, you can spend your free time doing other things. To start with I'll outline the other things.
Non-character advancing free time events:
Specialization training:
Location: Necropolis bureau district, the training center east of the Bureau building.
Time effect: +1
Use:
The training center is where you go to cash in your levels for stats and abilities based on your class, or if you don't meet the requirements for the next bonus class, you can go to get experience outside of the dungeons.
The first time you visit, you'll be greeted with a cutscene with a trainer dependent on your class (Batul for Technomancer, Mila for Esper, Kimi for Pyromancer, Miras for Geomancer). This will lead to you getting a new class specific ability.
The next time you visit after reaching level 7 you’ll get an increase to your stats depending on your class.
The third time you visit after reaching level 10 you’ll get a new class specific skill
TV
Location: Your room.
Preq: Buy a TV
Use:
Gain satisfaction. Nothing special happens here, though.
Karaoke:
Location: Necropolis Bureau District, east of the subway entrance.
Preq: None in particular beyond points
Use:
Satisfies a certain compulsion and gives satisfaction (more if you have the compulsion). In the future group outings will be possible to gain affection with two characters at once.
Stereo:
Location: Your room.
Preq: Buy a stereo.
Use:
Can change the BGM of your room and satisfy a certain compulsion while giving satisfaction. Cannot be used to pass time without the compulsion.
Clothing Upgrade
Location: Sylvan Grace
Use:
First event with new material triggers a time slot event that will increase affection with Erin and Ellis and give you a free (minus the cost of materials) upgrade of Erin’s outfit. Subsequent events won’t cost a time slot and can be used to upgrade your outfits or the outfits of companions (who will receive an affection point without using a timeslot).
As a note, upgrading your cocktail dress or your lifethread suit with cloudthread gives them little to no additional benefit:
The upgraded cocktail dress has +1 agility and -1 attack compared to the basic version.
The upgraded lifethread suit has +1 agility compared to the basic version.
Character advancing Events:
Trixie, The Red Rabbit:
House: Artemis Apartments
Benefit of events: Working at the Red Rabbit can net you Points and transformations that can increase your stats.
Trixie 1
Preq: None
Location: Red Rabbit (South of Bureau Training Center)
Desc:
When you talk to Trixie, she’ll offer you a part time position, she could really use the help. Take her offer and you’ll be carted away to put on the uniform. There’s some minor variation based on acceptance and otherwise, but there are no choices in this event. When you finish, you’ll receive 100 Points.
Trixie 2
Preq: Trixie 1
Location: Red Rabbit (South of Bureau Training Center)
Desc:
Trixie says she has a special surprise for you out back. She’ll send you out back to wait for a bit and come back with some coffee. You can question what’s in it, to which she’ll play coy unless you press her twice. Long story short, the coffee will make your butt bigger, decrease your agility, but increase your MP. Regardless, the choices you make right now are actually rather important.
If you want to avoid TFs, just refuse her. You’ll lose an affection point and a chance to go out front (and thus more income) until Trixie 3, but you’ll also gain access to a unique outfit.
If you want to maximize TFs, choose to drink it before you know what it is and then blow up at Trixie for not telling you. This will net you 2 affection points from her and a one-time bonus. In Trixie 3, it will allow you to request something that will give you two bumps to your breast size instead of one.
If you want to just let Trixie do whatever she wants to you, just drink it and play along or press her and drink it anyway. You’ll get an affection point for it.
If you get the TF, you also get:
- -5 Agility
- +10 Max MP
Trixie Repeatable
Desc:
Just a way to grind affection and gain more Points while doing so.
Trixie 3
Preq: Trixie 2, Affection >= 8
Location: Red Rabbit (South of Bureau Training Center)
What happens here depends on what you did in Trixie 2. Today is a maid day.
If you chose not to drink the butt coffee:
You’ll be told to “cross-dress” as a butler. This will allow you to earn more money.
If you drank the butt coffee and blew up at Trixie:
You’ll be given a choice whether to drink a tf milk raw or with some coffee. Raw will net you 2 bumps in chest size, coffee 1. You’ll only get the coffee sneakily if you didn’t blow up at her.
Regardless, the next step is to wear a maid outfit. After you change, Trixie will offer you a chance to earn more money by wearing a sluttier maid outfit. Choosing to do so will increase acceptance and affection from Trixie and give you more money for the shift. Replying “it’s cute” after she changes into a similar outfit will get you an additional affection point with her.
If you got 1 chest increase, you also get:
- +4 Defense
- +3 Attack
If you got 2 chest increases, you get instead:
- +6 Defense
- +5 Attack
-------------------------------------------
Ellis, Erin’s Twin, Sylvan Grace:
Race: Elf
House: Artemis Apartments
Benefit of events: New clothes and equipment with discounts.
Ellis's event progression is a bit different from other characters’. Instead of one event leading to the next with some prerequisites and choice variation, Ellis's line is nonlinear and all of her events so far require an external trigger. While she is not the only one who has/will have nonlinear events, she does have a focus on them.
Ellis "The Talk"
Preq: Erin 2
Location: Sylvan Grace
Time: Any
Desc:
Ellis will take you to the food court because she has something she wants to talk about. However, she seems to be more interested in hearing from you. She’ll start by getting you to talk about your past, this will vary based on degree, and you’ll be able to say whether you were studying what you were because it was something you like or pragmatism. This choice has no immediate consequence.
Eventually she’ll get to what you think of her brother. This choice will have effects beyond this event, so feel free to consider more than the affection boost.
Choices:
- He’s a nice guy: Affection +1
- He’s pretty reliable: Nothing immediate.
- He’s naive: Nothing immediate.
- He’s kind of a wimp: Affection -1
Next, she’ll question what your intentions are with her brother. Again, this choice will be kept track of. The only choice that has an immediate effect is “that’s none of your business” with a -1 affection bump. Otherwise, choose what you think is right for now. After this the event will end with no more choices.
Ellis Corset
Preq: Felix 2
Location: Sylvan Grace
Time: Any
Desc:
The only choice here is whether or not to buy the corset at a discount. You’ll need 250 Points. If you don't have enough Points to buy it, you'll get an affection point.
Wearing the corset for 5 nights gives you:
- Waist tf
- +5 Attack
Ellis Extravagant Clothes
Preq: Avarice Compulsion: 10 at some point
Location: Sylvan Grace
Time: Any
Desc:
Ellis will show you a suit and cocktail dress you can buy. If you buy one of them on the spot, you’ll save 100 Points. It’ll cost you 800. If you buy it, you’ll also get +3 satisfaction and +2 affection points with Ellis. If you don't have enough Points to buy it, you'll get an affection point with Ellis and lose 3 sattisfaction.
Stats:
Att +5, Def +20, M.Atk +6, M.def +20, Agi -4
Stats:
Att +9, Def +14, M.Atk +5, M.def +16, Agi +8
-------------------------------------------
Erin, Ellis's Twin:
Benefit of events: Satisfaction and character improvement (first new ability and stats come after 2 events).
Erin 1
Location: Red Rabbit
Preq: none
Accessed by: hanging out at the red rabbit
Bonus: satisfaction
Desc:
You'll have a debate about the virtues of ice cream vs coffee, that will net you an invitation to a date with Erin. No choices to be made here.
Erin 2
Location: Mall and Arcade.
Accessed by: Calling Erin in the afternoon
Preq: Erin 1
Desc:
This is an event with more variation than average. Your tfs, clothing choice and otherwise can all have an effect on the results, and there’s a hidden, Erin-specific variable being bumped here based on choices. Calling Erin when you have some time will have him invite you to the mall to go to a place showing off antiquities.
When you come by, he’ll compliment your choice of attire (differently based on what you wear) and you’ll head to your destination. Which is an arcade, as it turns out. Since Erin has no idea what a gaming arcade even is, the choice of what game to play is up to you. You should probably consider the person you’ll be playing with has no experience whatsoever playing any type of video game.
Regardless, your choices are:
- A racing game: If you dislike the idea of having fun with Erin, do this. He’ll be terrible at it and you won’t get any affection or satisfaction for the effort.
- A light gun shooter: An alright choice, since it allows you to cover for him and he’ll get to feel all protected by you. This choice will vary based on your hair length. Longer hair will get in your way at an integral moment, allowing Erin to have a chance to shine.
- Dancing game: This is the most effective choice, yielding 6 satisfaction, an affection, and Erin is actually good at it, to boot. This event will vary based on what you’re wearing, your butt size. If you have a bigger butt and are wearing a skirt, you’ll lose to him. If you’re wearing a skirt without a butt tf, you’ll win but barely. If you’re wearing the bureau outfit, you’ll win.
Next, it’s time to play a crane game. If you still have the Will-o-Wisp compulsion, then you’ll notice a bunny rabbit catching your eye. If you do get the bunny, and you already have the teddy bear, you’ll double the rate at which the Will-O-Wisp compulsion advances, increase the amount of satisfaction it gives, and give a tiny bonus to decoration score.
Regardless, here are the choices:
- Chick Keychain: Going for this will net you a successful grab and a free keychain for Erin. There’s nothing special about it. Erin, however, will notice you staring at the bunny if you have the will-o-wisp compulsion and grab it for you.
- The bracelet: You’ll miss if you try to grab it, but Erin will have better luck. This will net you the Souvenir bracelet accessory that only Erin will be able to equip. It increases magical attack and defense by three.
- Go for the bunny: You’ll miss and Erin will grab it for you.
Either case, once that’s finished there’s no more choices in the event and it’s just about over.
Erin 3 (optional dungeon)
Location: Mall and Dungeon.
Accessed by: having reached Erin 2 before 05/03
Desc:
This one is a bit special: after having done the Erin 2 event, Erin will call you in the morning in your room if the date is between 04/26 and 05/03. (You can do the Erin 2 event before that, he will then call on the 04/26). In this call Erin asks you to join him in an optional dungeon, but it must be done before 05/04. Replying with “Absolutely” at the start of the call will get you +1 affection point.
After that, you can find him in the mausoleum mall in front of his sister’s shop and if it’s the morning, you can go to this dungeon from there. If you go, you get +1 affection point with Erin. If you delay until it’s too late (05/04), Erin will call you to let you know it’s too late and you will get -2 affection points with him.
This dungeon should be rather straightforward, but there is a hidden tf that can be acquired there.
In the first part, after reaching the interior of the factory and freeing Alia, replying with “Don't mention it.” will get you +1 affection point with her, the other option gives -1 affection point instead. There are various consumables in boxes around the factory floor, but to progress forward, you will eventually need to go to the second floor. There you will face a mini-boss battle. After that, go up the ladder and examine the corpse at the top of the building, this will give you the admin card, that you can then use on the console in the room where you defeated the mini-boss.
You’ll then find an option to solve the situation by doing a minigame. The game involves trying to get 3 containers at the same level by transferring the liquid inside between them and battling enemies (don’t worry, the game does a better job explaining the minigame :) ). To get the hidden tf, you must fail to reach this goal for around 25 turns and ignore the “Hm?” prompt when it appears. This tf gives you an additional breast transformation and large sensitive nipples a dark shade of black.
- -5 Max MP
- +15 Max HP
As a note, acquiring this tf means forfeiting the reward for completing the minigame (200 Points), but it will get you an affection point with Erin if you offer to pay for the damage afterwards (you won’t actually have to pay anything, but you need to have 300 Points in hand to be able to select it). If you want to solve the minigame instead, one possible solution is:
- Green to Blue
- Green to Blue
- Red to Blue
- Red to Blue
- Blue to Red
- Blue to Red
- Red to Green
You will only have to fight twice in those 7 turns and you will not have the time to reposition Alia for participation in both fights so just choose who’s more likely to need help and stick with them for their battle. (“Fun” fact - “Erin’s” room only needs to be used twice so if you could order him to move you’d only need to fight once and with all 3 characters… talk about smart plans…)
This will get you the aforementioned extra reward and an affection point with Alia.
If you want to bypass the minigame and the tf entirely, you can alternatively throw a bunch of Eth into the vat in the room at the top left of the factory floor, this will also get you an affection point with Alia.
After that you get a cutscene and you go eat at a stand. During this meal, if you choose “Because you use all elements.” about Alia’s name, you will get an affection point with her. The other option will make you lose an affection point. Pulling Erin aside after that for a talk gives you another opportunity to get an affection point with him, if you select “Ask him why he stopped doing missions.”; otherwise you can lose an affection point by selecting “Ask if Alia did something to him.”; the third option does nothing.
The second part involves rescuing civilians (you get a 50 Points reward if you save the 4 of them) and defeating the dungeon’s boss. If you need help navigating this part, here is how to do it: from the stand, go up the ladder and take the exit to the left. From there, go down and take the exit to the right, that will get you to the part at the south of the stand. Then go to the right to go under the bridge, that will get you to the parking garage. In the parking garage, you have to go up the ramp/road in the middle of the screen to follow the boss. Once on the roof, before confronting the boss, you are given the option to stop there (you won’t get the shard and will get 150 less Points for the reward). If you continue and defeat the boss, you are given the choice between letting Erin try to fuse with the shard, or stopping him.
Letting him try has a serious consequence on Erin, giving him a new spell (Pretty Star bomber, a high damage spell with a 3 turn cooldown), but switching his genitals to female ones.
Stopping him lets you get the shard instead (Fragment of a Rainbow Sorceress) and you can later fuse with it.
-------------------------------------------
Felix, Marksmanship trainer
Benefit of events: New abilities, stats, clothes
Felix 1
Preq: 75 Points
Location: Bureau Training Center
Desc:
Just a class. It’ll give you a useful ability, mark.
Felix 2
Preq: Level 7, Felix 1, 75 Points
Desc:
This class will increase your stats.
- +8 Attack
- +3 Def
Afterward, Felix will pull you aside and give you some strange advice to improve your shooting: wear a corset. Visit Ellis and she can hook you up. For a price.
Felix 3
Preq: Ellis Corset, Felix 2, 5 days wearing corset to sleep
Accessed by: Calling Felix in the afternoon
Desc:
This training will give you a rather useful certain hit attack called mark shot. It does reasonable damage and works especially well against enemies with high defense.
Beyond that, the only choice here is whether you get distracted or not. If you do, you’ll gain an extra +1 affection point with Felix.
Felix 4
Preq: Level 10, Felix 2, 75 Points
Desc:
This training will give you a new skill called elemental bullets. This can be used twice a day and will cause damage based on your class.
-------------------------------------------
Ory, Middle Management:
Benefit of events: Potential satisfaction, potential TFs, information, ???
Ory 1
Preq: none
Desc:
This one is a joint Ory/Sybil event. You’ll walk in on Ory and Sybil having an argument. You’ll eventually be asked to take a side. The only way to gain a negative affection point with Ory here is by fence sitting. Go ahead and choose to side with either Ory or Sybil, neither will get a negative affection point with you and you’ll gain a point with who you side with.
After that point things will play out, and you’ll end up getting an affection point with Ory.
Ory 2
Preq: Ory 1
Desc:
When you walk into the office this time, Ory actually seems to be hard at work for once. She’ll naturally just ask you to take a load of paperwork down to accounting. If you choose to do it, you’ll initiate the event, if not you can do it later.
Of course, you have no idea where accounting is. So, now’s your chance to ask someone for help.
Choices are as follows:
- Ask random strangers. Will trigger a chinman flag
- Pester the receptionist. This will lead to Ory being questioned by the receptionist for foisting off work. -1 affection.
- Ygor has nothing better to do. No pluses or minuses.
Next, you’ll be offered to drink some water suspiciously. It’s got demon spit in it that will cause a mental tf that will have a large effect on how Ory 3 plays out. Choosing to drink it will net you a handy +5 Attack from increased aggressiveness and +2 Ory affection. Choosing not to will net you +1 Ory affection. Regardless of your choice, the event will end here.
Ory Repeatable
Preq: Ory 2
Desc:
After doing Ory 2, you’ll now actually be able to talk to Ory about random stuff that’s on your mind. Some questions are only available in week 2, and will actually trigger switches that will have an effect on the story. Regardless, if you want to get to Ory 3, you’ll have to choose how you’re going to do repeatables with her. This will also have an effect on your relationship going forward.
It’s a choice between:
A: Goof off and look up people’s death info.
B: Be her secretary for free!
Both will net you affection, goofing off will net you +2 satisfaction for your time and secretary work will net you +1, as she’ll buy you some eats afterward.
Ory 3 (aka first potential sex scene)
Preq: Ory 2, Affection >= 8
Desc:
You’ll notice some noises coming from Ory’s door and decide to investigate. There are two main branches for choices here. We’ll start with if you drank the spit water.
You’ll find that Ory’s door smells particularly alluring today. If you drank the spit water, the option to just leave the situation be will be grayed out. If you didn’t, you’ll first be asked how you feel about the display. If you choose aroused, refer to below. If you choose disgusted, refer to the next line of choices.
Aroused choices:
- Go inside. Going inside, Ory will notice you instantly and ask you to come hither. She’ll first point at her dick, wordlessly asking you to suck her off.
- If you decide to kneel, you’ll get a dick shrink tf and +3 to attack, agility, and defense.
- If you decide to stand and stare you will have an option to either:
- Either oral option will net +3 affection from Ory if you drank the spit water, +2 if you didn’t. You also gain a smidge of satisfaction.
- Reach for groin. You’ll get +2 satisfaction and +1 Ory affection and you’ll trigger a Chin Man flag.
- Just Watch. You’ll get +1 affection and trigger a Chin Man event.
- Leave. You get nothing but a Chin Man event.
Disgusted choices:
- Go inside. Ory will explain her situation and ask you to help. Choosing to will lead to a hand job and +1 affection with no TFs Choosing not to will lead to -2 affection.
- Walk away. This will lead to getting a bit of back info about Ory as you head to the vending machines where you overhear some office gossip. There, you can get +1 affection with Ory if you tell them off. In any case, you’ll lose 10 Points buying a drink and you’ll get a First Aid Kit.
-------------------------------------------
Sybil, Guide Trainee:
Benefit of events: Potential satisfaction, potential tfs, character improvement (First new ability and stat improvement comes after relationship level 2).
Sybil 1
Preq: Ory 1
Location: Artemis Apartment, Exterior
There are external factors that affect how this event plays out. The biggest changes in the event come from having a background in art and/or have your satisfaction at particularly low levels. You’ll break down and cry in her arms if your satisfaction is below 50 when you initiate this event for the most changes and you’ll also gain 8 satisfaction in that case. Asking Sybil to draw you, or having the art background and propose to get back to drawing with her will get you an extra +1 affection point with her
In either case, you'll find that after the argument with Ory, Sybil now appears in front of Artemis Apartments on the bench during the evenings. You can talk to her with the intention of cheering her up after her argument with her sister.
Sybil 2
Preq: Sybil 1
Benefits: After finishing this event and heading out on a mission or toward the Arena with Sybil present, an additional scene will play, the results of which are her stats increasing and her gaining a new regeneration spell.
This event has no choices and varies entirely on what choice you made in the previous event and whether or not you have the art background
Sybil repeatable
Preq: Sybil 2
This is just a repeatable affection gaining event. It will vary based on your choice in Sybil 1 and whether or not you have the art background, but beyond that you'll get a slight satisfaction boost and an affection point with Sybil.
In current content, if you did everything you could to gain satisfaction with Sybil in choices in and out of her events, you'll have to do this event 3 times. There will be more opportunities to gain affection outside of events or in group events with Sybil in the future, however, so this will change.
Sybil 3
Preqs: Sybil 2, Sybil Affection =>+8
You go up to Sybil’s room to get ready. You’ll find a dazed looking fairy around and Sybil being a scatterbrain and not remembering using posing dolls. Odd.
If you have an art background, the start of this event will be you drawing Sybil. She’ll tell you to pose her however you want, and you’ll gain an affection with her if you tease her about her wording. You can also choose the pose that you’ll draw her in. Otherwise, the beginning section will simply vary based on your choice in the first event.
After the beginning section, Sybil will move on to drawing you. She’ll ask you to choose from three poses. You can pretty well guess what kind of effects each pose will have in the long term, but for the first visit this won’t have an obvious effect. The 3 choices are:
- The Confident Pose: The female model is standing confident, hip busted out to the side with an arm on it, with hips much wider than your own. Sybil underlines everything that should bolster your confidence while painting you => +1 acceptance only if you accept the face tf (see below)
- Agony and Ecstasy: The male model has his arms above his head, as if bound by invisible ropes. His lips are pursed in an expression between agony and ecstasy and are quite a bit plumper than yours. Sybil underlines how you are trapped in your situation while painting you => +1 acceptance
- The Melancholic Pose: The young male elf model is turned around and looking at something on the ground. He looks weighted down by immense melancholy. His shoulders are unusually slim. Sybil underlines everything you lost while painting you => -3 satisfaction
The choice that’s more pertinent for the moment is whether or not you allow her to make changes to your face in her drawing. If you say yes, you’ll get yourself a face TF, an affection point with Sybil, and a new conversation option with Ory (you can even call her about it if you can’t access her office). If you say no, however, you’ll lose an affection point and nothing else.
Everything else will play out how it will.
-------------------------------------------
Kita, Ninja/stalker:
Benefit of events: Potential satisfaction and character improvement (first new ability and stats come after 2 events, not implemented in current version)
Kita 1
Preq: Week 2 or later
Location: Trixie's cafe.
If you decide you want to spend time with your former stalker, you'll have to have a chance meeting. Currently, the only way to have such a chance meeting is to bum around the Red Rabbit. Talk to Trixie and choose to hang out. If you haven't done Erin 1 and you really want to make sure you do Kita 1 first or Erin's events don't fit into your schedule, save before doing the hang-out event, since you'll have a fifty-fifty chance to run into either Erin or Kita.
When you finally do run into Kita, he'll try and fail to flirt with Trixie and invite himself to sit next to you. From there, there isn’t a choice to be had, though there will be tiny variations based on whether you’ve done certain other events.
-------------------------------------------
Seki, Samurai:
Benefit of events: Potential satisfaction, stat increase, and character improvement (first new ability and stats come after 2 events)
Seki 1
Preq: Week 2
Location: Artemis Interior, just outside the stairwell.
Convince Seki to hang out with you and you’ll be going on a long, LONG walk to Seki’s favorite food cart. The event’s straightforward, though there is a choice that will be kept track of later. Seki will profess that this is a masterful top tier food establishment and wants your opinion on it. Your choice here will have consequences in future events, but in the current event, humoring her and exaggerating how good it is will net you an affection point, the other choices won’t give you a negative point.
After all’s said and done, the exercise will give you a slight defense buff of 2.
Kita/Seki 1
Preq: Kita 1, Seki 1
Location: Artemis Apartment Interior
This combo event can be accessed by talking to Seki after doing an event with both her and Kita. After sending them off to meet, you can either choose to follow Seki or wait for her at Artemis. Choosing to follow her will net you a convo with Kita, if you choose to tell him to do it himself, you’ll have a long convo that will lead to +2 affection points with him. Choosing to wait will net you a convo with Seki and an affection point with her.
-------------------------------------------
Delia, Vampire/Nosferatu:
Benefits of Events: Character improvement (new spells and stat boosts to Delia after event 2)
Delia 1
Preq: Week 3, Evenings only
Location: Artemis Apartments 2nd Floor, just right of the stairs on a chair
Upon speaking to Delia she will indicate a desire to chat about something, agreeing to listen will result in sitting with her in a few moments of awkward silence before you are given a choice of what to say, saying you will listen (“I'm willing to listen, if you want to talk.”) will net an extra affection point from her, then she apologizes again for her behavior, and states that she can’t control her power(unsurprisingly) and needs help practicing. If you agree she will be pleased and give a point of affection for your “obedience”, for a total of +2 affection points for this event. Refusing will instead lose you an affection point immediately and gain you an affection point at the end of the event, making the net result +1 affection point for this event and she will mind-control you into helping her.
Alternatively, replying with “If you’ve got nothing to say, I’m leaving” will lead to a similar choice as above: +2 affection points if you agree to help her ; 0 affection point and being mind-controlled otherwise.
Delia 2
Preq: Delia 1, in the evening only
Location: Same as Delia 1
Talking to Delia now will result in her asking you to follow through with your promise to help her, agreeing (+1 affection point if not mind-controlled) will have you both go to the yard with wine bottles of blood where she will attempt to replicate the effects of Angel Blood with normal blood (with several failed, yet admittedly amusing attempts). Upon succeeding she’ll get a package of a gem, and go to draw your blood, with a syringe this time, revealing that she was once a med student. Once done she’ll use your blood to make a blood golem and try to overcome a barrier while extracting the blood from it so she can exploit enemies, during this you’ll get a choice to indicate that you are feeling a bit anemic and she’ll bite you to share blood so you can keep going (+1 affection if mind-controlled, +2 otherwise), or tough it out (+2 affection and you get some healing items) and collapse after she succeeds which will cause her to panic and bite you after you blacked out, showing that she truly cares for you. (End result: +1-3 affection points with Delia)
Alternatively, instead of agreeing to help directly, you can suggest another solution. This one will grant an affection point with Sybil AND Delia will get a puppy (As we saw in her dungeon, she really likes puppy, so I know which of the two I’m choosing :D ). If you selected this option, after the initial testing, you can volunteer to be the test subject instead of the puppy, this will grant an affection point with Delia. In this alternative scenario, it’s Delia who faints after the effort of creating the spell takes its toll on her, and you bring her back to her room with Sybil. There, you get +2 affection points with Delia if you are mind-controlled, +3 otherwise, as well as some healing items. You’ll also get a couple points of satisfaction. (End result: +2-4 affection points with Delia, +1 affection point with Sybil, +2 satisfaction and Delia gets a puppy :) )
(After this event she’ll have access to the spell Blood Bank, that does moderate damage to one target and heals the whole party, and an increase to most of her stats)
Delia repeatable
Preq: Delia 2, in the evening only
Location: Same as Delia 1
A repeatable event to up your affection score with Delia
Delia 3
Preq: Delia 2, in the evening only, Affection =>+8
Location: Same as Delia 1
The start of this event will differ based on if Delia got a puppy and how far you are along the Sybil events (poor puppy :( , but don’t worry, the puppy might just be a little bit different).
This event can have several outcomes. First Delia will ask you about your original body. A few of the options will get you an affection point with Delia:
- I was super curvy.>Big breasts are overrated.>I'm fine with it.
- I was petite.>I always wanted to be curvier.>You do look cute.
Alternatively, choosing the following replies will get you a -1 affection point:
- I was petite.>I always wanted to be curvier.>OK, sure, whatever.
Saying that you were curvy and liked it, or that you were petite but wanted to be curvier will set a flag possibly used in future events.
After describing it:
-If you said that you are okay with your new body:
- If you are not mind controlled, she will then either try to offer you 100 Points as a reward for helping her(accepting grants you +3 affection points in addition to the 100 Points ; refusing and settling for a payment in friendship gets you +2 affection points instead).
- Otherwise, if you are mind controlled by her, she will improve your reaction time, but will also accidentally transfer the way she picks up her teacup to your subconscious, getting you +1 affection point:
- +2 Attack
- +2 Agility
-If you said that you are not okay with your new body and miss your previous one, or that your body was average, she will attempt to transform your new body.
- -If you let her, you get a slender shoulders tf and:
- +4 Magic Attack
- Thanking her afterwards rewards you with +2 affection points.
- -If you struggle you get 2 choices:
- -If you try to run, you will get a -1 dick shrink tf and a vampiric brand giving you:
- +15 Max MP
- +4 Magic Attack
- +10% Cold and Dark resistance
- -10% Fire and Light resistance
- In addition, Delia will discover your sex. Depending on your response after that, if you say you consider yourself a male and are not mind-controlled, you get a game over, on the other hand, if you are mind controlled, she will use this as additional leverage to keep you under her control, but the game will not end if you identify as a male, in addition if, while mind-controlled, you don't know if you identify as man or a woman, you will get +1 affection point. If you instead say that you were female or that you consider yourself female, she promises to help you get a body closer to your gender identity and to keep your secret. For this, you either get +1 affection point if you say it was a mistake or it was fiend shenanigans, +2 affection points if you say you identify as a woman. Note that if you have low acceptance, saying you identify as a woman will result in a loss of satisfaction, but if your acceptance is high enough, it will confirm it by giving you +1 acceptance.
- -If you try to talk, you can then allow her to continue, giving you the slender shoulders tf and +4 Magic Attack (but no affection point). Or you can refuse giving you -1 affection point if you are mind controlled, -2 affection points if you aren’t.
-------------------------------------------
Evan, Laptop, MMO character:
Benefit of events: Satisfaction, and ???
Laptop 1:
Prereq: Buy a laptop from Eternal Rest.
Desc:
You finally got your laptop and you boot it up for the first time to find that it came with a free trial of an MMO. So, you go ahead and boot it up to find an in-depth character creator, which brings us to the first choice. This choice is important and changes a lot of things about the events that follow on this line, but since the event line itself isn't finalized, the exact consequences aren't going to be outlined here. Suffice to say that it greatly changes this and the next event depending.
The choices of character are a big, buff burly male orc for some compensation problems (-1 acceptance), the pedestrian "recreate myself" but before any changes option, or may as well make a foxy girl character option (+1 acceptance). As of now, this has an effect on how characters in the mmo perceive the main character and bumps, take away from, or does nothing to the acceptance variable.
Beyond that you’ll get 5 satisfaction points.
Laptop 2:
Prereq: Laptop 1.
Desc:
This one simply varies based on your choice in Laptop 1.
Laptop repeatable:
Just a way to grind affection. There’s no third laptop event for the moment.